Rimfire Central Firearm Forum banner
  • Whether you're a greenhorn or a seasoned veteran, your collection's next piece is at Bass Pro Shops. Shop Now.

    Advertisement

Trigger Pictures: Brno #1/3 vs CZ 452's and Brno Model #2/4/5's

1 reading
23K views 27 replies 14 participants last post by  evolution1974  
#1 · (Edited)
Okay this is for OldSwede as much as anything...I've been promising to do this for some time. Below you will see the two triggers contrasted...hope it's useful to you all.

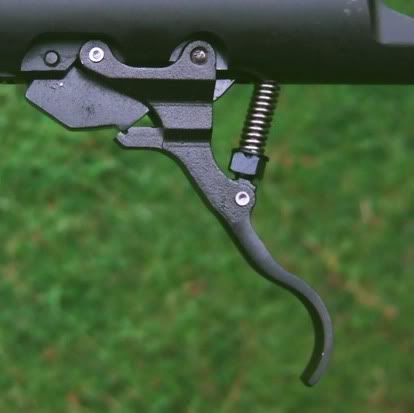
Trigger for a Brno Model #2's, #4's, #5's and all CZ rim-fires.

(For all CZ Bolt actions except the Basic)
.
Image

*Borrowed from Nick Bangkok & then cropped...hope you don't mind.
.
.
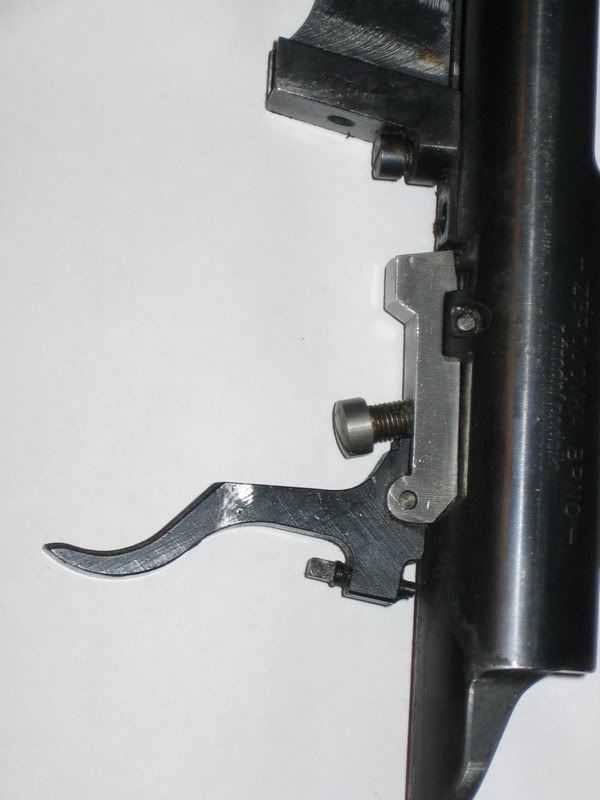
Brno Model #1's and Model #3's

Image


There is a Model #1 / Farmer who's trigger is not adjustable and is similar to the CZ Basic/Farmer but I do not have one nor a picture. I know CB900F has one and hopefully he will post a picture or PM me one to post.

While the Model #1/#3's triggers may initially seem a bit more rudimentary, they are pretty adjustable. I've had had fairly good luck by adjusting the two screws that you see and gaining excellent triggers without ever stoning. Partially though, they smoothed up by running a couple of bricks through them in addition to my adjusting.

Edit: Added an excellent comparison picture by "beammeupscotty" showing the two different Model #1 triggers. Left is the NON-adjustable the right is adjustable. Excellent pics Scotty...thanks.

Image


For more info and swapping the two see the following link.....

Link: Brno Model #1 triggers

Cheers,
 
#2 ·
TOU : Thanks for posting the pictures. The old M.1 trigger is a modified Mauser trigger that can be adjusted for reasonably good two-stage let off.
1. Turn the small screw behind the trigger in until it touches the receiver. At this point it'll feel like a creepy single-stage trigger.
2. Back out the small screw one turn at a time while testing the let-off. One can feel the difference between "take-up" and "let-off" (before and after the small screw touches the receiver).
3. Once you lose the "let-off" and it become a creepy single-stage again (but lighter than when you started), turn the small screw back in half a turn to get the second pull. Fine adjustment to taste.

The large slotted head screw acts as trigger stop.
 
#7 ·
TOU : Thanks for posting the pictures.
You are most certainly welcome! I only wish we could replace your M1 for you as well.

1. Turn the small screw behind the trigger in until it touches the receiver.
I usually back mine off only slightly..maybe a 1/2 to a full turn from the receiver. As noted, I think a brick or two makes these two surfaces smooth out quite a bit...which also explains why this tends to "lighten" somewhat over time. Also a (very small) bit of CLP ect between these two surfaces helps "smooth" the creepiness out a bit.

The large slotted head screw acts as trigger stop.
Does this not effectively adjust out some of the "creep"? It seems to have this effect for me as I can virtually eliminate it on mine by the two adjustments and still be left with a fairly light trigger.

Additionally, one needs to be careful on this, as I have also adjusted these so tight that you can not get the trigger to pull...or conversely one can make the trigger almost unsafe. My brother's is so light with zero "creep", that it's concerning to lend to those who are not used to or aware of it....Actually he shot a whole in his SUV once. :eek: :eek: :p
 
#3 ·
These picture show the difference between a two stage trigger and a single stage trigger.

The model 1/3 trigger's rear screw adjust the takeup while the front screw adjust the engagement of the sear/trigger and hence the creep of the final stage.

The model 2/4/etc. trigger is only adjustable for trigger pull weight with the nut on the spring strut. The Brook kit as used on the 452 puts sleeves on the second from the front pin (resting on the bottom of the barrel) that forces the trigger rearward to "pre-pull" it, minimising the sear/trigger engagement , hence minimising the creep. There is also an adjustable sear that does the same with a screw.

Good contrasting pictures for seeing the difference between versions of single and two stage triggers.

LDBennett
 
#6 · (Edited)
Glad you liked it...so is this the trigger you have OS?

Nick & LD....excellent explanation and input. I intentionally left this open as I knew you all would explain it better than I ever could. Thx for all you do...your concise descriptions, directions and input is of great value and appreciated! :t
 
#16 ·
Here is a little bit more info to add to Tou's post...

the other #1 trigger, which is what my #1 has. Sorry, but I had a bit of trouble with glare so my pics are not as good as Tou's.

Image


another view:

Image


note: the red arrow indicates the pin that holds the trigger in place. The blue arrow shows where the trigger spring resides. I replaced the stock spring with a lighter one which helped the pull weight a lot. On the other end of the assembly you may be able to make out a bit of light colored grey material. This is a bit of epoxy which I added to reduce sear engagement a bit, helping remove a little creep. Same principle as the Brooks kit sleeve.

Image


The two red arrows highlight the odd thing about this trigger. It has two captive rollers which rest against the under side of the action when the trigger is in place. They act as a rolling fulcrum when you pull the trigger. They are responsible for much of the creep I suspect, but also are likely the reason the pull weight is so light, especially for a military training rifle. This trigger breaks at just over a pound, measured with a Lyman gauge.
 
#20 ·
the other #1 trigger, which is what my #1 has. Sorry, but I had a bit of trouble with glare so my pics are not as good as Tou's.
Nice job Scotty and I thought the pics were pretty dang useful. :bthumb: Thx for stepping up and posting them as I'm sure it will be helpful to others. Nice job with the epoxy, I didn't think of that. I know that CB900F has one like this that's in nearly pristine shape that he was saving for his son...still had the original cosmoline on it. As to the ages, I'm guessing that most were early, but the one I had was a later vintage. I think it was just available that way much like the CZ 513 basic is now. I wished someone would post some pics of it's trigger to compare....might prove interesting.

Incidentally, I used to have one like yours and gave it as a gift to my father. Canada kinda went through a time where you had to limit the # of rifles you had before becoming officially a "collector". So he decided that he didn't really want it and gave it back to me saying he had other rifles he liked better...never even shot it. I wasn't impressed...I immediately sold it. Kinda wished I'd kept it from a collector's point of view now but wasn't a collector then...and was a bit irritated so wanted it gone. Silly now as I think about it :eek: ...but that was several years ago. Times change....
 
#19 · (Edited)
Image


TOU : I used that big screw as trigger stop. After adjusting the rear screw for distinct take-up and let-off, the front screw was turned in until it's head would catch the front edge of the trigger piece right after the firing pin release.

But that screw also provides another adjustment option, as posted by LDBennett 15 minutes after I did on 12-12-2006...

"... the front screw adjust the engagement of the sear/trigger and hence the creep of the final stage."

That large screw, when turned in far enough, would push against the underside of the receiver, moving the sear down and thus reducing total engagement.
 
#21 ·
TOU : I used that big screw as trigger stop. After adjusting the rear screw for distinct take-up and let-off, the front screw was turned in until it's head would catch the front edge of the trigger piece right after the firing pin release.
True, I also noticed you can adjust this so far down that you can't even release the trigger...just need to back it off a turn or two and you will find a sweet spot so long as the rear screw is touching. A bit heavy though.

But that screw also provides another adjustment option, as posted by LDBennett 15 minutes after I did on 12-12-2006...

"... the front screw adjust the engagement of the sear/trigger and hence the creep of the final stage."
Agreed...thx for the reminder, great info.

That large screw, when turned in far enough, would push against the underside of the receiver, moving the sear down and thus reducing total engagement.
Exactly...as noted above, so long as you don't do this too tight as you then have no engagement.

As always Nick, great input. I was playing with one last night which had a pretty decent trigger. I pulled it out of the stock to see where it was set from CAI. Both screws were completely threaded out with no engagement whatsoever. Believe it or not, it was a great trigger!
 
#25 ·
Thx guys for the vote of confidence and thx Nick and Scotty. However, I have made my own personal Sticky page of CZ-RFC links. Just click on the Brno Logos in my signature and my write ups and some specific technical thread s are linked. I keep meaning to go back and find some of the others and will one of these days.