Rimfire Central Firearm Forum banner
  • Whether you're a greenhorn or a seasoned veteran, your collection's next piece is at Bass Pro Shops. Shop Now.

    Advertisement

Western Field m815 Makeover!!

3.6K views 23 replies 8 participants last post by  NightFighter  
#1 ·
I decided to make an aluminum trigger guard, butt plate, and grip cap for this rifle, before bedding it and refinishing the stock.

Here's the original thread:

http://www.rimfirecentral.com/forums/showthread.php?t=158385

Its such a nice shooter, I couldnt help wanting to see if it can shoot even better. It has a really tight bore, [24 inch barrel], and has shot some small groups already.

Here are some pictures of the trigger guard in process. I will update as the project progresses.

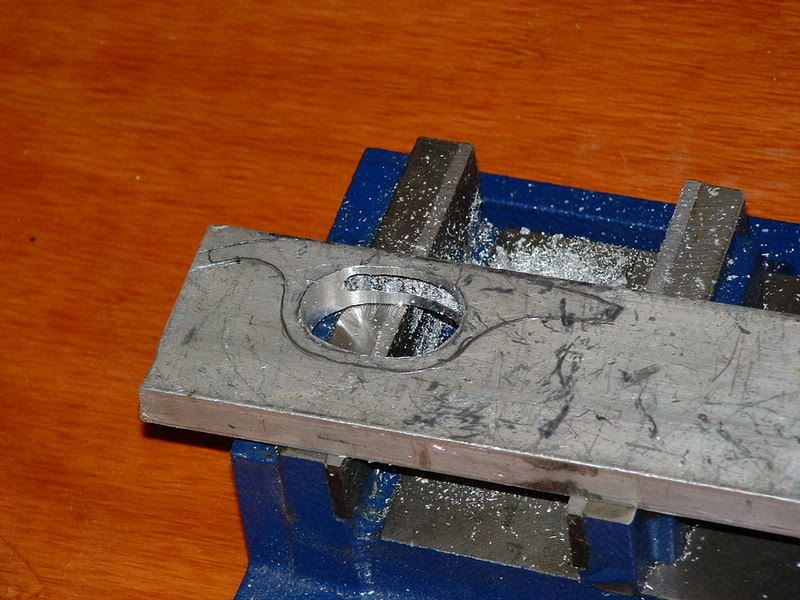
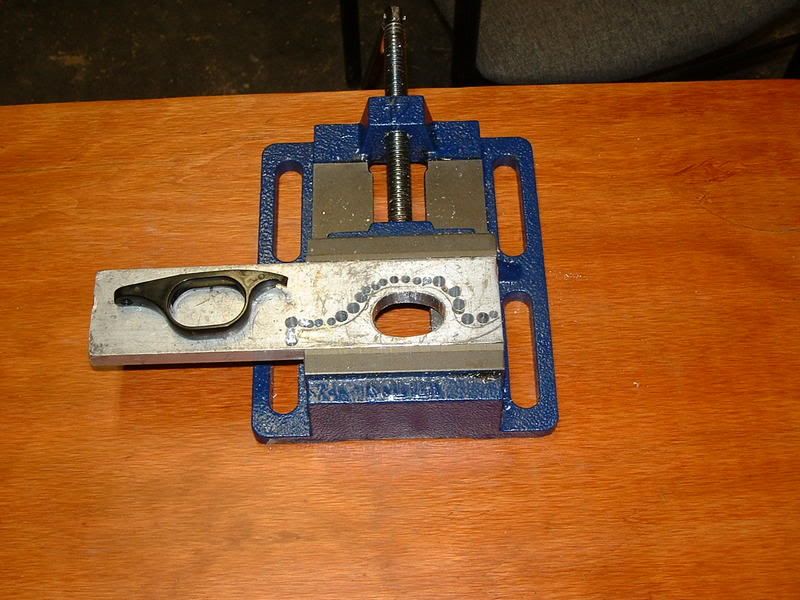
First I drilled the slot for the trigger... then drilled and sabre sawed the finger hole...then drilled holes befrore cutting out the outline.

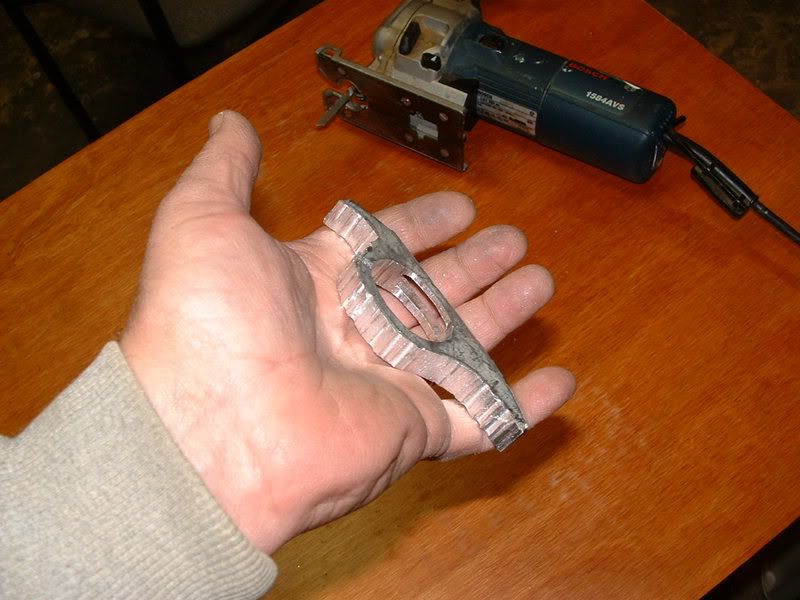
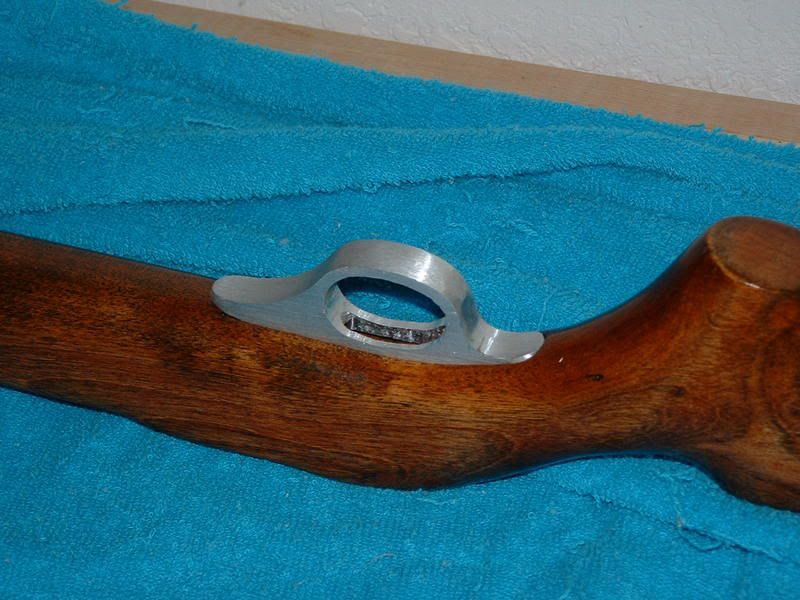
After rough shaping, the next step is to fit it to the stock. Last photo shows bottom fit, but the stock needs to be inletted a little more for the front of the trigger guard.

Then will come finish shaping, contouring, and polishing.

Thanks to Hipshot for encouraging me to go for it, and to Jim McCoin for his advice on using a lubricant, as well as cautioning me against one of my spookier ideas. :)

Image

Image

Image

Image
 
#3 ·
Don't think you will have to worry about that one shrinking on you!!!:rolleyes:
Do you have any idea how much hand filling you have to do on that thing????
Hope you have a dremel!!!!;)
God Bless, Frank.
Thanks Frank, nice hearing from you.

I don't have a Dremel...yikes!!

Have to see how it goes...right now a milling machine is tempting. :)

NF
 
#4 ·
Really and truly.....

All you need to finish that off is a good set of hand files and a file card to keep your files clean and cutting smoothly!! A good set of needle files will help greatly also!! A 4 to 6 inch dia buffing wheel and a little metal polish (from Home Depot) and it will look like a mirror. Attention to detail and PATIENCE are the last two ingredients. Looks like you have the job well in hand but I'll add good luck anyway!!!!!!!!!!
God Bless, Frank.
 
#6 ·
All you need to finish that off is a good set of hand files and a file card to keep your files clean and cutting smoothly!! A good set of needle files will help greatly also!! A 4 to 6 inch dia buffing wheel and a little metal polish (from Home Depot) and it will look like a mirror. Attention to detail and PATIENCE are the last two ingredients. Looks like you have the job well in hand but I'll add good luck anyway!!!!!!!!!!
God Bless, Frank.
Thanks Frank..Its coming along. Last session I had a couple scarey moments, but it turned out fine. One more session and I'll post more photos. My beltsander rigged upside down really works well except where the curve is too small a radius. A little more shaping and I'll be doing the final contour and polishing.

chig..I will get some more photos, in the next couple days, I hope. I think this is going to be a real beauty.

NF
 
#7 ·
lastest testing

So I have been wanting to refinish the stock, but wanted to bed and pillar it first. I was nervous about the bedding because it shoots pretty good the way it is. This morning I decided to run some tests to see how bedding might affect it.

Man, it was neat!

I wanted a material with just a little give, but not too much, so I cut some narrow strips of vinyl from a piece of rug-runner...that clear stuff with the nubbies on it.

I had been studying the stock and action and penciled out the areas I might be bedding. So I put in small pieces of vinyl in those places...first one layer in two spots, then one layer in three spots, then two layers in two spots with one layer in the third spot, etc, etc..

End results are very encouraging, for bedding the forward portion of the reciever, the barrel up to the balance point, and floating the rest of the barrel. Even then I will also test a pressure pad, because that set up did well today too.

I didn't want to refinish until after bedding, and now I'm totally stoked on it..I'm positive it will shrink my groups by more than half, because it did today.
That helps a lot, as I'm planning on putting a lot more time into the looks of it.

This one is fitting the pattern I like: First it feels good in my hands..second, it shoots good, and third, its gonna look good.

Gotta finish the last bit of risky work on the TG asap, so I can fit it to the stock.

If anyone is interested, let me know and I will try to get some target pictures up tonite. [I shot 25 targets today, and got some really good info about what works.]

NF
 
#8 ·
Targets

Here's the target with no rifle modifications. It was a bit windy today, but a lot less than what you would call normal around here. The groups are fairly consistant.

Image


...this target was shot with 2 'shims' under the front of the reciever and the first inch of the barrel, [fore and aft of the take down screw],and one under the barrel an inch back from the end of the fore end of the stock. The groups got considerably smaller. In fact, every combination of 'shims' I tried was a noticeable improvement.

Image


It also did well with test 'bedding' under the front of the reciever and under the first 2 1/2 inches, [up to the balance point of the barreled action]. This last target is 10 shots rapid fire..that is, from the time I look into the scope, the shot is fired in less than two seconds. It shows potential to me, as it was a difficult target for me to see an aim-point. I think it will do better if I shoot a diamond target, which I will once the permanent bedding is completed.

I'm interested to see how the epoxy bedding results compare with these vinyl shim tests. I'll let you know.

[...all targets shot with Fed Auto Match.]

NF
Image
 
#12 ·
Want to make a couple of those for me!!!!???:rolleyes: :hide: Very nice work!!! Make sure you post some pictures when you have it all finished and installed on the rifle!!!
God Bless, Frank.
lol..I will post more pictures soon...I squared up the base yesterday and drilled & countersunk holes for the screws. Its a little tricky jigging my router to enlarge the inset for it in the stock, because the grip is in the way...don't have any laminate trimmers anymore, but there's usually a way to do a thing.

Next, I need to make a particularly complicated pillar for it. Its a challenge with the tools I have, but do-able...I think.

Then a grip cap and butt plate out of aluminum as well. Then re-bed, and refinish the stock.

I gotta laugh when I think back to how I was going to do four rifles this winter..I'll be lucky to finish this one..winter just doesn't last that long here. :)

NF
 
#13 ·
Trigger guard inletting.

You may be better off doing that with hand tools. that's how most gunsmiths do it. Too easy to screw up that beautiful stock with some ill fitting piece of machinery.

I have one question about the rifle. How long is the barrel frome bolt face to muzzle?
 
#14 ·
You may be better off doing that with hand tools. that's how most gunsmiths do it. Too easy to screw up that beautiful stock with some ill fitting piece of machinery.

I have one question about the rifle. How long is the barrel frome bolt face to muzzle?
Its got a 24 inch barrel...I like the length, and its a sweet rifle to shoot. My 70 year old Remington Target Master has a 27 inch barrel. I like that one too, but can't mount a scope..

NF
 
#17 ·
More adventures in aluminum..

Thanks for all the kind words...it helps keep me going when things get dicey, or like a couple days ago, when my first attempt at making a pillar failed.

So...I started on the pillar next, so I can get the bedding finished before I refinish the stock. Don't have the inletting done yet for the trigger guard...need to get my hands on a little piece of tool steel to make a small curved chisel.

The pillar for this rifle is more complicated than some, but its 75% finished, and I'm happy with the results so far. Here's the basic design:

Image


When installed, the TakeDown screw will not fall out when you unscrew the barrel and action from the stock. It still needs to be fitted, so that it bears up against the bottom of the barrel lug, and keeps the barrel and action 1/16" above the stock inletting. Then I'll bed it.

Here's how it started today:

Image


I drilled the smallest hole first, the one that will get tapped for 10-32 take down screw. [#21 drill bit] Then drilled a countersink hole for the screw head, [after grinding the screw head smaller], and the thread relief hole.

Next, put a long #8 bolt through the hole and double nut it and chuck it in the drill press, [after taking the corners down with the belt sander]...it needed a little trueing up with a double cut file, [with parrafin rubbed on it], held in a drill press vise to keep things square.

Image


Here's a photo of the nearly finished pillar and the re-ground screw head on the soon to be new take down screw...[still need to grind down some of the threads near the head of the screw.

Image


Most pillars I've seen are a little bit simpler, but they all do the same job, and the same techniques would seen to work well for making them. I'll post photos of a couple of my set ups next.

NF
 
#18 ·
Belt sander and sanding mandrel

I made this sanding mandrel from a half inch copper bolt I had in the bolt bucket...needed the samaller radius, and got tired of a 75 cent sanding drum lasting 3 minutes...even with parrafin.

Cut off the head, chucked it in the drill press to file it down to a shank, cut a slot in the threaded pard to slip a strip of sandpaper in, [or a pieced of t-shirt charged with tripoli compound], and filled the threads with black silicone.

I wrap a longish piece of sandpaper around it and secure with a small rubber band on top...it works nicely to sand and polish the inside of the trigger guard.

Image


Simple set up for my beltsander. Holds it upside down on a workmate folding bench, and I can sit down with my earmuffs on and a bucket of water at my feet and do a lot of shaping on it. Parrafin on the belt is desirable, as Jim told me, and a pair of leather gloves is a pretty good idea too..

NF

Image
 
#19 ·
finished pillar/takedown screw

Yes, I managed to finish the pillar today. It needed to be shortened, and to get a precise measurement, I drilled the hole in the stock first. Then I measured, marked the pillar, put a bolt and double nut through it for a shaft, and chucked it in the drill press. It cut off nicely to the exact length I needed by holding a hacksaw blade with the teeth against the direction of rotation. Then I tapped the interior hole in the pillar with 10-32 threads to accept the takedown screw.

Next I had to make a longer takedown screw. Ground the head smaller to fit my countersunk hole in the pillar, and then needed to remove the threads just under the head of the screw. For the rifle to tighten up properly, the screw threads must disengage from the internal threads of the pillar, just before threading into the barrel lug.

To remove that section of threads, I chucked the machine screw in a battery drill and held a file against the threads. After a test fit, I had to remove four more threads to get a perfect lockup.

This is a little trouble to go through, but the nice part is that when you dissassemble the rifle for cleaning, the takedown screw does not fall out. I wasn't sure how I was going to do it with limited tools before I started, but it turned out to be reasonably easy, as long as I was slow and thoughtful.

Before I did something, I made sure it was in the right order. I also tested a similar machine screw in the battery drill to make sure it didn't ruin the threads I needed to keep. Bingo..it worked, and I'm excited to get the stock refinished, install the pillar, and bed the rifle.

NF

Image

Image
 
#20 · (Edited)
Progress today..

Inletted the stock for the trigger guard today, then went back to finish the shaping on the grip cap. It will get a final fitting on the stock, along with the buttplate, which is next on the list. Then it will be time to finish the bedding, and then refinish the stock. I'll keep you posted. :)

Here's a photo of the grip cap:
NF

Image
 
#21 ·
Dang Kevin! That is a lot of really good work for that old beauty! She won't know how to act with all those new clothes on! I would have taken some shortcuts on making the pillar... you really went over and above... making that trigger guard from scratch was really nice work! Well done! :bthumb:

I'd like to see pics of the stock bottom and inletting before you touch anything there. Are you going to leave all the aluminum polished or are you thinking of anodizing it? You can get all sorts of colors anodized, including dark blue/black to match the rest of the rifle.

As far as finishing that beautiful wood, that is impossible for me to offer an opinion on without seeing it in person. It looks good in the pics, but I know as old as it is it might look pretty worn. The good thing is to get a nice oil finish on that wood is fairly simple... not easy because of the time, but a simple process.

Good job man... keep it up. :bthumb:
Mark
 
#22 ·
Dang Kevin! That is a lot of really good work for that old beauty! She won't know how to act with all those new clothes on! I would have taken some shortcuts on making the pillar... you really went over and above... making that trigger guard from scratch was really nice work! Well done! :bthumb:
Thanks Mark..considering how many absolutely stunning rifles you have, I consider that high praise indeed.

I'd like to see pics of the stock bottom and inletting before you touch anything there.
I'm not sure what you mean..the stock bottom? ..the underneath? As for the inletting, I have already free floated the barrel and taken a first run at the bedding. As per post #7 in this thread, I had a really great improvement using flexible/hard vinyl between the metal and the stock in three places..thought I had it.

Bedded both sides of the takedown screw and figured I would put a pressure pad under the forward inch of the forend of the stock and have it made..well, unfortunately, I didn't have it made. :( I found that it was over-sensitive to takedown screw pressure. I spent two days, all day long, shooting it and trying different combinations. I started to see how it was responding, came up with a good plan, and began sanding out the bedding material, [JBweld]...so I don't have a before picture of the inletting, but I'll photograph it as is if you'd like to see it.

Soo..thats why I decided to make a really nice pillar that would register metal against metal against metal. It makes the barrel and action sit about a sixteenth high, while the receiver bottoms out solidly in the rear. I'm planning to aso bed a small portion where a pressure pad would go, for stability, and then see if a small shim improves the groups or not.

Let me know what you would like to see pictures of besides the inletting. I'll be happy to post them for you.

Are you going to leave all the aluminum polished or are you thinking of anodizing it? You can get all sorts of colors anodized, including dark blue/black to match the rest of the rifle.
I'm planning to leave it shiny for starters, and see what it looks like when the stock is refinished...then, who knows?? Color is definitely a possibility though.

I have another project that I want to sporterize for Super Stock, an old Mossy semi automatic carbine, that I plan to have the aluminum parts anodized black. It won't show up in photos as much, but it will look like a very stock rifle.

As far as finishing that beautiful wood, that is impossible for me to offer an opinion on without seeing it in person. It looks good in the pics, but I know as old as it is it might look pretty worn. The good thing is to get a nice oil finish on that wood is fairly simple... not easy because of the time, but a simple process.
The wood is very nice and its in nice shape..the previous owner put a gloss finish on it, and did a reasonably good job. My camera tends to pick up reflected red from the rest, so the color in my pictures isn't accurate. In person its a little lighter, and it looks so much like Mango wood, that I couldn't believe it. I still call it the Mango Rifle. :)It looks more like walnut in the photos, and it is a little lighter than that, and actually pale where I sanded it down to bare wood.

What I end up using for a stain will depend a lot on how the wood looks when its stripped and sanded. The gloss finish was put on without removing the old finish perfectly. Noone but me has ever noticed it, but for me it has to be right. If I can get the wood really clean and consistant looking, and if the grain shows promise of being prominent enough, I will start with a transparent stain/dye and then Tru Oil. If it shows a tendency towards being blotchy looking, then I will use the stain/sealer combination like the sample I sent you, and then Tru Oil.

Thanks for the encouragement, and let me know what you'd like to see pictures of.

I sure hope this turns out the way I'm seeing it in my minds eye; it's been a really interesting project...challenging because I didn't have all the How-to threads, like I will for my 10/22, but that has forced me to do a lot of thinking about each step, and that has helped me learn.

I can't wait to post photos of it when its finished.

Kevin
 
#23 ·
Kevin, you hit spot on... I'd like to see the underneath to see the pillar installation. And since I don 't see any pics in post #7 :confused: , some pics of the inside inletting from the top.

I know you will do right on the refinishing! You reminded me that I still have a nice walnut stock I have to finish shaping... dang it! Too many projects... too few Markbo's!
 
#24 ·
Kevin, you hit spot on... I'd like to see the underneath to see the pillar installation.
Just took some..will get them posted as soon as I can..danged flash inside the garage..hope they turned out.

The original action screw[takedown screw], was a big headed screw that would bear down directly on the wood. It was thread relieved so as to not drop out of the small hole in the wood, which is what gave me the idea to do that for the screw I used in the pillar.

I drilled out a 3/8" hole for the pillar to be epoxied into, centered under the 7/16" hole for the barrel lug.

And since I don 't see any pics in post #7 :confused: , some pics of the inside inletting from the top.
oops..sorry about that..#7 wasn't about pictures, it was about how I determined where to bed it.

I know you will do right on the refinishing! You reminded me that I still have a nice walnut stock I have to finish shaping... dang it! Too many projects... too few Markbo's!
Haha..man, do I hear that..I actually thought I was going to finish 3 projects out of 4 this winter..yikes!!..winter only lasts 3 or 4 more weeks...I'll get back with the pictures..right now I have an apointment to keep.

NF