Rimfire Central Firearm Forum banner
  • Whether you're a greenhorn or a seasoned veteran, your collection's next piece is at Bass Pro Shops. Shop Now.

    Advertisement

Ruger Precision Rimfire - Full Build

7K views 19 replies 12 participants last post by  michael51392  
#1 ·
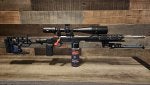
Just thought I'd share the full RPR build I've recently completed in case anyone else was looking to go down the rabbit hole! I have a fully decked out CZ457 build and I was trying to see if i could get my RPR to the same level of consistent accuracy. It's a long list but I think the end result is outstanding. The new CNC machined chassis combined with the MDT buttstock and pistol grip are a massive improvement over the stock composite chassis. The increased weight of the chassis along with the butt and forend weights make for a much more balanced and stable platform. For the price the stock barrel is pretty decent, but the IBI barrel is far and away a huge improvement. I also spent time and parts improving the bolt. A dremel with a polishing wheel and fine polishing compound is essential for smoothing out the bolt and making for a much slicker cycling action. Timney trigger is a must have over the stock one. Far more adjustment range and a very crisp break followed by a short reset. As with most builds like this, there's not much left of the original RPR other than the action. But it was interesting building up in stages to see what had effects on accuracy and to what degree. In the end, you could probably buy something off the shelf for the same amount invested in parts, but it was a blast to put together a custom build.

Parts list:
Chassis - New release from Sharpes Bros - RPR Heatseeker chassis (currently the only aftermarket RPR chassis?)
MDT Skeleton Rifle Stock with AR adapter
MDT Elite Vertical Pistol Grip
MDT Rear bag rider
MDT Buttstock and forend weights
Barrel - IBI, 20" stainless steel, fluted, threaded
Trigger - Timney 2 stage adjusted down to 8 oz
RPR bolt handle upgrade
Hammerhead bolt knob
Red Bolt Shroud
Extended mag release
Area419 ARCA Rail
30MOA picatinny rail
Vortex Viper PST Gen2 5-25x50

Image
Image
Image
 
#7 ·
Certainly a great job on the build! It looks great! I hope it shoots as good as it looks. What ammo are you using in it? Any target pictures to post?

I bought a RPR, mine will hang right with my best CZ457`s. So i have zero plans to fix something that isn`t broken. Since i bought mine awhile ago, seems its hit-n-miss with alot of them as far as accuracy goes. I guess i got lucky with mine, it SHOOTS LIGHTS OUT! Mine isn`t as ammo fussy as my CZ`s are either. Its really fun gun to shoot.
 
#10 ·
Thanks for all the great comments and feedback. As far as ammo goes, I've had the best success so far with Center X and SK LRM. Eley Match has also proven to be quite good. I haven't been to the range since I received the chassis a few weeks ago, as the weather here in Kingston hasn't be great. Looks like it will be okay for this Saturday so I'll be sure to post pics of the targets with a few different types of ammo. I'm hoping to see at least .1 or .2 improvement. I've shot the RPR (pre-chassis) side by side with my CZ457 build , the CZ routinely beats it by .1 to .3 across all ammo types. I'm really hoping the time and money invested pay off!! And yes...no cherry pickin' the best groups...the pressure is on.
 
#11 ·
It was a good day to shoot here in Kingston on Saturday. Temps were on the cool side at +1 C and there was very little wind. Ran through Center X, SK Flatnose Match, Eley Match, SK Rifle Match, SK Long Range Match and Eley Team. All types shot fairly well, but it clearly preferred some over others. And for some reason every single five round group of Eley Match was one inch left. No wind to account for, and i never touched the scope from start to finish. This new RPR build certainly shot better than my stock configuration and is very close to my CZ457 build. There's still room for improvement, maybe some lot testing will help. Overall I'm happy with the results though.
Image
Image
Image
Image
Image
Image
 
#12 ·
I well know that 22 rifles are finicky about ammo and what one loves another may hate. I haven't gone up the ammo ladder very high and haven't shot it all this year due to health reasons. Mine is stock except for a Timney trigger to take care of the constantly hanging up center blade on it's stock trigger that I never managed to fix. I got as far up as RWS Target Rifle using what could be found at local stores which got me into the 50 yard .4's at 8 bucks a box for the last I bought. I first tried it when I found some at Big 5 Sports for $5 a box. Here is hoping I get to shoot more this year and can try some higher grade ammo.
 
#15 ·
At the moment, with four weights up front and one at the rear in the stock, and with MDT Skye bi-pod mounted, the balance point is dead center. Works perfectly with the rotary mags if your shooting off a barricade with a bag. I haven't experimented too much with the weight distribution yet, but I think if I removed the bi-pod I'd likely have to remove the rear weight to keep the balance point the same. Rear weight in and bi-pod off, the balance point shifts a few inches back. With a larger bag it likely won't matter.
Image
 

Attachments

#16 ·
Here's the poor man's version 😂 oh wait the budget minded version.

Image


This rifle was purchased as a gift for my baby girl, for her 9th birthday. She has been shooting air rifles for a few years now. So I figured she's ready for a bolt gun. The Ruger RPR made sense. I figured it's bolt action just like her air rifle. So it should make for a easy transition in to the world of 22lr rifles. The fact that the stock could be easily and quickly adjusted was a huge selling point. I figured the Ruger RPR was a great rifle that she can grow with and enjoy for a very long time.

Turns out , she kind of hates the rifle 😂. The main complaints the action, she had a hell of a time working the action. I agree cycling the action was down right brutal it felt as if I was filing metal 😆. The trigger was a hair to heavy but the worst part for her was the safety blade. I agree as well and there was a bit of binding going on with the safety blade.

Alright so my goal was to smoothen the action, install Arca rail, lighten up the trigger, and soften up the trigger safety blade. Let's get to work.
Image

Here's the bolt body after lightly filing all the edges and polishing them.
Image

Changed our OEM bolt knob for a eBay $15 dollar knob. It's significantly longer giving my baby girl more leverage to work the action.
Image

Here's the receiver after filing / polishing the edges.
Image

" "
Image

" "
Image

Those bolt guide rails are slick.
Image

Here's the receiver all scuffed up and ready for paint.
Image

Here's the trigger components all polished up. The trigger safety blade is super slick.
Image

Here are the modified OEM springs. I ended up trimming 4 coils off the safety blade spring and permanently compressing the last 3 coils of the trigger return spring.
 
#17 ·
Image

I see no reason for the void in the stock so I filled it using JB weld .
Image

Here's another view.
Image

Here's the stock after a paint job. Since I knew I wasn't gonna invest any more money into this rifle. I was gonna have to make this thing look decent on the cheap.
Image

Here's the stock all put back together. It looks pretty freaking cool. The inside of the stock was painted as well even gave it a extra coat. I figure it will help make things a little tighter.
Image

Here's the mag catch block. I purposely went heavy on the paint here.
Image

The face and bottom were not painted as it would probably cause issues.
Image

Here's the block slapped together. It's got a thick layer of paint on top and sides. It should help for a tighter more secure fit in the stock.
 
#18 ·
Image

Here's the receiver after paint. Notice I didn't paint the inside and all threaded holes were masked off.
Image

Here's a nude pic of the receiver 😆 after paint
Image

For all the freaks out there here a pic of the rear 😆
Image

Here's the rail installed with medium strength thread locker torqued down to 20 inch pounds.
Image

Here's the bolt catch in place.
Image

Here's the trigger unit all slapped back together. Lightly coated all internal components with grease.
 
#19 ·
Image

Trigger installed on to the receiver. Dang that's already to many different colors 😆.
Image

Action is absolutely butter.
Image

Action all put together. A thin layer of acrylic glue was applied for bedding barrel into the receiver and immediately was torqued to 32 foot pounds.
Image

Then the handguard was installed I forgot to take pics of the handguard after paint. The thin layer of paint really helps tighten things up and made for a super center handguard. Screws were torqued to 25 inch pounds using medium thread locker.
Image

Here she is all slapped together. The mag block sat super tight yet still removable against the stock. I torqued down the action screws to 25 inch pounds let it set a day then re-torqued them to 35 inch pounds.
Image

Here's a pic of the $20 Arca rail I installed on the RPR. All hardware was torqued to 15 inch pounds using medium thread locker.
Image

Here she is with a $40 CVlife bipod and Modified Arca to weaver $15 mount.
 
#20 ·
Image

Here she is ready for some action. The RPR was topped off with a $100 CVlife Featherweight 4-16 magnification scope for the price I'm super impressed.

I can't wait for my baby to shoot it. The action is so much easier to cycle now. The trigger is absolutely beautiful. No binding super smooth crisp break.
Image

Lowest trigger pull weight setting. Test was out of 5 pulls.

Avg 13.5 oz
Low 10.5 oz
Max 1 lb 0.6 oz
Image

Here's the results on the heaviest setting. Tested using 5 pulls.

Avg 1 lb 9.2 oz
Low 1 lb 6.2 oz
Max 1 lb 12.7 oz

I imagine those number will probably drop by 2-3 oz once everything settles. Super happy with the results. The safety blade pretty much offers no resistance and is super slick. Something I forgot to mention is the firing pin was also polished. Here are a few examples of what I was capable of printing with the rifle before all the modifications. These are prime examples.

Image

5 shoot @ 50yards
Image

5 shoot @ 50 yards
Image


Here are 2 10 shot @ 100 using the Feds CPHP 36 grain

Il do my best to get out to the range asap and get a range report.