I have spent many hours looking all over the Internet for plans to make a portable shooting bench. I found quite a few, but I decided to make this one first because it is made from one sheet of 3/4" plywood, and it only required a few screws, some 3" utility hinges and I figured it would look pretty nice when it was done because it was pretty simple and wouldn't take a lot of time for me to get it done. (Actually I might have spent more time taking pictures, drawing plans and writing up this web page than I did actually building it.)
I choose Birch/Maple plywood because although it was more expensive than CDX, it had two nice surfaces and was cheaper than ABX, which since I would have to finish any bench to protect it, the stain method ended up cheaper than going with an exterior paint. An added plus it was real pretty by the time I got done. If you haven't done much in the way of wood projects this is a nice simple one to start with. My daughter just loves it when she get to play with wood with her Dad. Also, if you don't have too many woodworking skills, don't sweat it. This project really doesn't require any.
Make sure you start with nice wood and you will end up with a nice bench. Avoid the really cheap plywood such as CDX (you will be painting forever to fill in the holes,) MBX or hardboard (it will be so heavy you may never lift it, incidentally it is hard to get good screw attachment with this stuff and it isn't actually a plywood anyway,) or OSB (they call it chipboard for a reason and because it would just plain be ugly.)
Here is a view from behind.
![Image]()
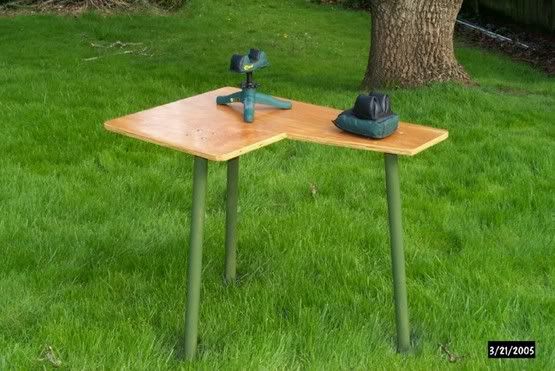
Here is another picture from the front.
![Image]()
A shot from the left.
![Image]()
And another from the right.
![Image]()
I want everyone to understand that I didn't come up with these plans all on my own. I looked at many others before I decided on building this one. Actually, I am in need of two more benches. I may come up with something else for those. I am pretty happy with this one, but I think two smaller ones might work out as good company for this one. There is somewhat limited space where we go shooting as a family and I think that we only need one big one like this. It is sort of like shooting from your desk. In fact when I go to work now I think about shooting something all the time. Or maybe something else is the cause of that?
Again, I just modified the plans I had pieced together on the net. I don't have a really awesome drawing or drafting program at home so these might be a little crude. They should work just fine, but please note that although the measurements are accurate I have already discovered one error involving scale. Yup, the 10" measurement for the slots to hold the leg support appears shorter than the 9" base for the right legs.
And after I got all done I realized that I neglected to draw the two little rectangular sections that are used to brace up the stool base to the stool legs and attach them to the stool top. Not a big deal however as I did take lots of pictures.
Without further ado, here are the plans for cutting up the sheet of plywood. This is your standard 3/4" thick 4' by 8' sheet. The black lines are the edges and cuts in the wood. The red lines are dimensions where appropriate. Blue labels identify the piece and gray stuff is scrap.
![Image]()
If you notice you can cut the sheet into two easier pieces to handle if you cut it at 3' - 6", or 4' - 6" depending on how you look at it. I am referring to the cut between the left leg shim and the right leg panel. All of the gray portions are scrap so you will have enough left over to make those two supports on the stool that I mentioned. Also, I used up as much left over wood on the stool top as possible making it 1' - 3" across. Most of the plans I found only called for a 1' top but I find this one more comfortable.
One other point I should mention. My rudimentary drawing skills and technology did not allow me to properly illustrate the radiused edges. I cut all the plywood with a saber saw and used a 2" radius on all of the edges. If you choose to do the same, make special note between the left leg and the bench top. Also note the 3/4" gap there. This is necessary because the left and right legs do not attach exactly the same way. And the left leg has to be 3/4" shorter than the right leg because of the shim used to attach it to the bench top.
![Image]()
The right leg attaches at a 90 degree angle. This allows for a little bit of additional support when the leg is unfolded. When it is folded the bench top and the right leg will lay flat upon each other.
![Image]()
The left leg has a shim that is first attached to the bottom of the bench top, and then the hinges are attached to that. This allows the leg to open more than 90 degrees which is necessary to place the leg support through the notches. Also, when folded this creates a nice little gap so that the right leg is sandwiched between the left leg and the bench top when the unit is folded flat. When you attach the shim, bring it in 3 1/2" from the outside edge. This will allow for the thickness of the left leg and the leg support notch for the wedges to maintain a nice right angle.
I choose to use Stanley 3" utility hinges. They were cheap, the brass looked nice with the wood and they came with the necessary screws.
![Image]()
Here is another picture of the left leg hinge and shim arrangement for further clarity.
![Image]()
The leg support and leg stops go together pretty easy. I went ahead and glued and clamped them together before pre-drilling and fastening them with screws. You can also see from this detail that I fastened the stops to the front side of the support from the back first (i.e. screwed through the plywood and into the stops.) You will want them 3/4" away from the interior edge of your notches. This will allow for the thickness of the plywood used for the legs. In the cut out diagram I placed the notches 2" in from the edges but you can see that from the pictures this bench is actually only 1". You can do either but I recommend 2". Do what I say, not what I do? Whichever you choose, make sure that the edges of the leg stops are the same distance apart as the inside dimension between the legs where they attach to the bench top.
![Image]()
Then I glued, predrilled and fastened the stops to the back side of the support by screwing through the stops into the plywood. That explains why you see three screw heads on the back of the supports and no screw heads on the stops fastened to the front. Again I used brass colored screws. I have lots of them from various other wood projects. You can buy them by the box or the pound usually at most hardware stores. I think they are #8's? Anyway, they use a #2 Phillips bit and the ones I choose for most of this project were 1 1/4" long.
![Image]()
![Image]()
Here is a picture of the leg support with stops head-on. And another one from the top.
![Image]()
![Image]()
Most of the "one-sheet-of-plywood" bench plans I found had a stool with four legs. They were each 1' - 6" by 6". They also had a very complicated procedure for attaching two of the legs together at 90 degree angles and then attaching all four together again. I didn't think that made for a very visually appealing or stable platform to sit on. So I came up with a stool base, two stool legs, and some little rectangles to hold the works together. Basically it is pretty simple. Attach one leg to the base, fastening with only one screw into the leg from the back of the base. I used 2 1/2" screws for all of the base to leg attachments. Make it tight and countersink the head into the base. Then rotate the leg so that you can attach the other leg from the opposite side of the base. I put four screws into the second leg along with a little glue. Then you rotate the first leg back into position and use two more screws to secure it. These last two screws I predrilled at a 45 degree angle to the top and bottom of the first leg-starting from the second leg, going through the base and then into the first leg.
![Image]()
![Image]()
After you have both of the legs attached to the base of the stool, how do you get it fastened to the stool top without screwing through the top into the base and legs? I choose to go in from the bottom. I used two little pieces of scrap plywood to sturdy and square up the leg to base connection. I pre-drilled through the legs and base into the rectangles. Once done with that I again applied glue before screwing through the rectangles and into the base.
![Image]()
![Image]()
If you want to do something fancy with the legs you could always cut a scallop out of the bottom in the center. Or I suppose you could cut a Bezier along the the outside edge-probably look like a mushroom though and that is why I avoided it. Left in the hands of a more skilled craftsman I am sure something could be done to fancy it up a bit. I was just going for function and this seemed sturdy and simple. Three pointed legs might actually be a bit more stable.
Did I mention that you need more wood than just one piece of 4' by 8' plywood?
![Image]()
![Image]()
Well, not much, but you will need about a 7" inch section of 2" by 4", which if you didn't know this already it is really 1 1/2" by 3 1/2". You will want to cut it diagonally across the 7" length. A band saw would be great if you had one, but I just clamped mine down on the the top of my saw horses and went at with a the saw from my miter set. It took a while but I think they turned out alright after going over the edges with an orbital palm sander.
![Image]()
![Image]()
I finished my bench with MinWax PolyShades in high gloss Pecan. This is not a commercial plug for them of any sort. Use what you like, I just choose this stuff because it was cheap, readily available in case I needed more to match another bench later and you can use those really cheap foam brushes with it. I suppose with wood this nice you could use just about anything. I used two coats on all surfaces-one applied before the screws and hinges, one after. Just wanted to mention that if you aren't real familiar with polyurethane it does take a while to set up. So on the first coat don't worry too much about drips and drops. After a day or so you can take those off. Don't use steel wool as it will just get stuck to everything. Also, don't use sandpaper as you will just be heating it up and creating a lot of gummy goo which will look worse than the original drips. I just use a nicely surfaced (read this to mean not the el cheapo version) putty knife. The excess just peels away. Stay with the grain as you don't want to nick up all that pretty wood. After you have it all cured up and assembled, hit it with some 000 steel wool to give the second coat something to stick to. Eventually I ended up with four coats on the bench top itself. Very shiny, very slick. Since it gets transported in the back of my truck and we shoot a lot I figured it might as well start out nice as it will never last.
Oh, here is how it all goes together, real simple. Place it on the forward edge of the bench top. Here is a view from the right.
![Image]()
Here is a view from the left.
![Image]()
![Image]()
Insert the leg support into the right leg. You will need to have the left leg opened at more than a 90 degree angle to do so.
![Image]()
Now insert the other end of the leg support into the left leg.
![Image]()
While you have it on it's edge, secure the wedges into the leg support.
![Image]()
Ok, that's all folks...start shooting!
And be careful leaving this out in the yard. When I was taking pictures my wife came to the conclusion that this would make a nice buffet table for outdoor barbecues. Yeah, right...
http://mark.perkinsfamily.org/firearms/psb.html
I choose Birch/Maple plywood because although it was more expensive than CDX, it had two nice surfaces and was cheaper than ABX, which since I would have to finish any bench to protect it, the stain method ended up cheaper than going with an exterior paint. An added plus it was real pretty by the time I got done. If you haven't done much in the way of wood projects this is a nice simple one to start with. My daughter just loves it when she get to play with wood with her Dad. Also, if you don't have too many woodworking skills, don't sweat it. This project really doesn't require any.
Make sure you start with nice wood and you will end up with a nice bench. Avoid the really cheap plywood such as CDX (you will be painting forever to fill in the holes,) MBX or hardboard (it will be so heavy you may never lift it, incidentally it is hard to get good screw attachment with this stuff and it isn't actually a plywood anyway,) or OSB (they call it chipboard for a reason and because it would just plain be ugly.)
Here is a view from behind.

Here is another picture from the front.

A shot from the left.

And another from the right.

I want everyone to understand that I didn't come up with these plans all on my own. I looked at many others before I decided on building this one. Actually, I am in need of two more benches. I may come up with something else for those. I am pretty happy with this one, but I think two smaller ones might work out as good company for this one. There is somewhat limited space where we go shooting as a family and I think that we only need one big one like this. It is sort of like shooting from your desk. In fact when I go to work now I think about shooting something all the time. Or maybe something else is the cause of that?
Again, I just modified the plans I had pieced together on the net. I don't have a really awesome drawing or drafting program at home so these might be a little crude. They should work just fine, but please note that although the measurements are accurate I have already discovered one error involving scale. Yup, the 10" measurement for the slots to hold the leg support appears shorter than the 9" base for the right legs.
And after I got all done I realized that I neglected to draw the two little rectangular sections that are used to brace up the stool base to the stool legs and attach them to the stool top. Not a big deal however as I did take lots of pictures.
Without further ado, here are the plans for cutting up the sheet of plywood. This is your standard 3/4" thick 4' by 8' sheet. The black lines are the edges and cuts in the wood. The red lines are dimensions where appropriate. Blue labels identify the piece and gray stuff is scrap.

If you notice you can cut the sheet into two easier pieces to handle if you cut it at 3' - 6", or 4' - 6" depending on how you look at it. I am referring to the cut between the left leg shim and the right leg panel. All of the gray portions are scrap so you will have enough left over to make those two supports on the stool that I mentioned. Also, I used up as much left over wood on the stool top as possible making it 1' - 3" across. Most of the plans I found only called for a 1' top but I find this one more comfortable.
One other point I should mention. My rudimentary drawing skills and technology did not allow me to properly illustrate the radiused edges. I cut all the plywood with a saber saw and used a 2" radius on all of the edges. If you choose to do the same, make special note between the left leg and the bench top. Also note the 3/4" gap there. This is necessary because the left and right legs do not attach exactly the same way. And the left leg has to be 3/4" shorter than the right leg because of the shim used to attach it to the bench top.


I choose to use Stanley 3" utility hinges. They were cheap, the brass looked nice with the wood and they came with the necessary screws.


Did I mention that you need more wood than just one piece of 4' by 8' plywood?


Oh, here is how it all goes together, real simple. Place it on the forward edge of the bench top. Here is a view from the right.

Here is a view from the left.


And be careful leaving this out in the yard. When I was taking pictures my wife came to the conclusion that this would make a nice buffet table for outdoor barbecues. Yeah, right...
http://mark.perkinsfamily.org/firearms/psb.html

")