I've been working on a project stock that is one of those "design on the fly" and "play with ideas" kind of thing. I had a bunch of ideas floating around in my head, but had no real idea just how they might (or might not) work out together. The fun is in the challenge of making things work.
At some point I realized that I needed to install a rear cross pin anchor, i.e., binder post, Chicago screw, or whatever you might call them. Okay, so I needed to drill a hole through each side of the stock.... that's easy. The hard part is in getting them in exactly the right place. I put the stripped receiver in the stock and soon realized that there is just no real way to drill a hole from the inside using the receiver as a template. So I came to the obvious conclusion that I needed some way to register the rear trigger guard pin hole location exactly on the outside of the stock.
Well, it turned out to be as simple as drilling three holes in a piece of 1/8" aluminum angle stock. The whole thing, including some other things, required less than one hour. The best part is that the jig was free and was immediately available.
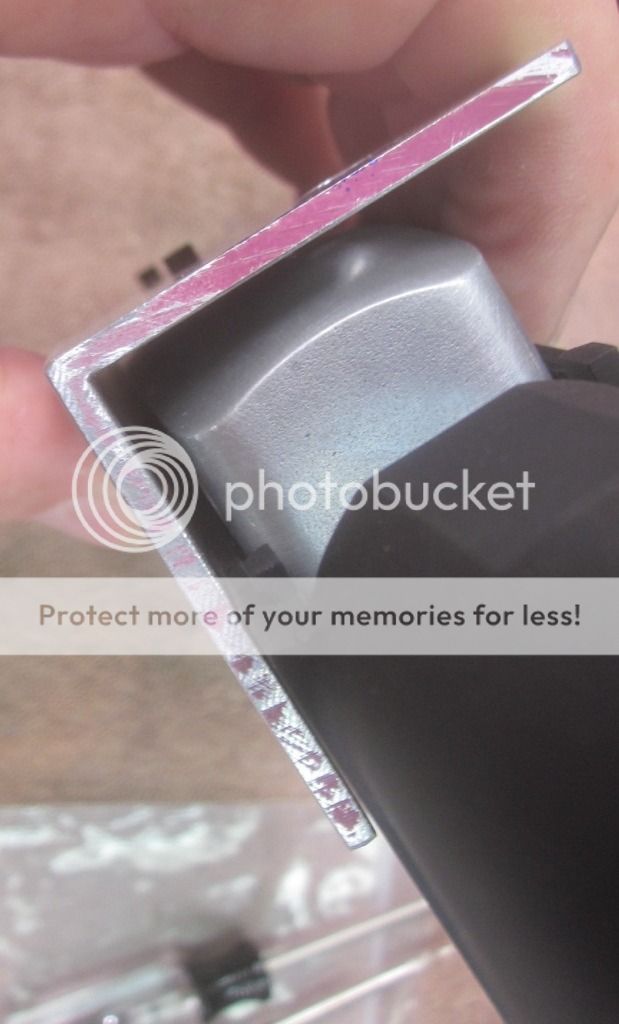
I found a piece of aluminum 2" angle stock in my junk bin and cut off a short piece.
![Image]()
I wanted to attach this to the top of the stripped receiver so that one side of the angle reached down the outside of the stock. I decided to use one of those old style Ruger 3/8" tipoff mounts in order to transition from the rounded receiver top to the flat angle piece. It was also thin enough that I wouldn't need a real long 6-48 screw to reach through it.
![Image]()
I used a scrap block of wood to space the receiver out from the leg of the angle piece. Next time I will use a somewhat narrower piece in order to reduce the spacing a little closer to the actual side of the stock... but this worked out okay for me this time.
![Image]()
I clamped the receiver to the angle piece (clamp not shown in this picture) and marked the location of two mounting holes.
![Image]()
Drill the holes as per the notes on the picture. The 9/64" hole is just right for the 6-48 screw to slide through without any wiggle.
![Image]()
Deburr and countersink to get a little more length out of a 1/2" x 6-48 screw (which is the minimum length that will work).
![Image]()
It's no secret that 6-48 screws are hard to find. It just so happened that I had a Power Custom scope base that I intended to mount on this build, so I borrowed a couple of the mounting screws for this little job. Tighten the screws snuggly, but they don't really need a lot of torque.
![Image]()
![Image]()
Carefully guide the 3/16" drill bit through the trigger guard holes and drill a hole in the aluminum piece. Take care not to wiggle the drill and ream the insides of the receiver holes.
![Image]()
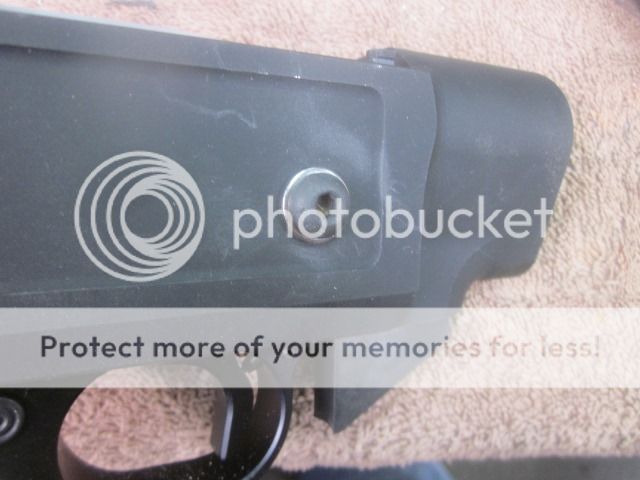
That's all there is to it. It's now ready to use.
![Image]()
Mount the receiver in the stock. If you feel the need, you might want to mount the barrel first for additional alignment accuracy.
![Image]()
Attach with the takedown screw.
![Image]()
Following the notes on the picture, drill the cross pin holes.
![Image]()
...AND here you go, easier done than said.
![Image]()
Now if you intend to use a 3/16" binder post pin, you are done. Just assemble and carry on.
....BUT, if you'd like to install a 1/4" pin, you have some additional work to do.
Start by carefully drilling out the holes in the stock to 1/4",
![Image]()
...followed by drilling out the rear cross pin holes. In this particular case I'm not doing the front cross pin.
![Image]()
![Image]()
...AND finally drill out the trigger guard rear cross pin hole to 1/4".
![Image]()
Okay now you can assemble your build using the 1/4" binder pins.
Continued in Part 2
At some point I realized that I needed to install a rear cross pin anchor, i.e., binder post, Chicago screw, or whatever you might call them. Okay, so I needed to drill a hole through each side of the stock.... that's easy. The hard part is in getting them in exactly the right place. I put the stripped receiver in the stock and soon realized that there is just no real way to drill a hole from the inside using the receiver as a template. So I came to the obvious conclusion that I needed some way to register the rear trigger guard pin hole location exactly on the outside of the stock.
Well, it turned out to be as simple as drilling three holes in a piece of 1/8" aluminum angle stock. The whole thing, including some other things, required less than one hour. The best part is that the jig was free and was immediately available.
I found a piece of aluminum 2" angle stock in my junk bin and cut off a short piece.

I wanted to attach this to the top of the stripped receiver so that one side of the angle reached down the outside of the stock. I decided to use one of those old style Ruger 3/8" tipoff mounts in order to transition from the rounded receiver top to the flat angle piece. It was also thin enough that I wouldn't need a real long 6-48 screw to reach through it.

I used a scrap block of wood to space the receiver out from the leg of the angle piece. Next time I will use a somewhat narrower piece in order to reduce the spacing a little closer to the actual side of the stock... but this worked out okay for me this time.

I clamped the receiver to the angle piece (clamp not shown in this picture) and marked the location of two mounting holes.

Drill the holes as per the notes on the picture. The 9/64" hole is just right for the 6-48 screw to slide through without any wiggle.

Deburr and countersink to get a little more length out of a 1/2" x 6-48 screw (which is the minimum length that will work).

It's no secret that 6-48 screws are hard to find. It just so happened that I had a Power Custom scope base that I intended to mount on this build, so I borrowed a couple of the mounting screws for this little job. Tighten the screws snuggly, but they don't really need a lot of torque.


Carefully guide the 3/16" drill bit through the trigger guard holes and drill a hole in the aluminum piece. Take care not to wiggle the drill and ream the insides of the receiver holes.

That's all there is to it. It's now ready to use.

Mount the receiver in the stock. If you feel the need, you might want to mount the barrel first for additional alignment accuracy.

Attach with the takedown screw.

Following the notes on the picture, drill the cross pin holes.

...AND here you go, easier done than said.

Now if you intend to use a 3/16" binder post pin, you are done. Just assemble and carry on.
....BUT, if you'd like to install a 1/4" pin, you have some additional work to do.
Start by carefully drilling out the holes in the stock to 1/4",

...followed by drilling out the rear cross pin holes. In this particular case I'm not doing the front cross pin.


...AND finally drill out the trigger guard rear cross pin hole to 1/4".

Okay now you can assemble your build using the 1/4" binder pins.
Continued in Part 2