Rimfire Central Firearm Forum banner
  • Whether you're a greenhorn or a seasoned veteran, your collection's next piece is at Bass Pro Shops. Shop Now.

    Advertisement

Rubber barrel bedding my DSP

16K views 54 replies 9 participants last post by  Vincent  
#1 · (Edited)
RTV barrel bedding. Been doing it to my 22s for along time. Have always gotten good results with it.

Parchment paper is thin and no-stick and what I use to release. I have tried greasing the barrel with no paper/plastic barrier and it is a NO GO.

Stretch wrap is okay but needs lube and harder to use with less smooth results.

The Glad version shown has a nice golf-ball style dimple finish. Still prefer the smooth, clean, simpler, easier parchment paper.

Ace brand 100% silicone caulk is the only one I use now. It stinks the most (by far and I mean really far). IMO, works the best of anything in a caulk tube. Don't even consider DAP. GE Silicone II is okay. Permatex black gasket maker and adhesive is w/o doubt the BEST imo but also the hardest to use and most expensive. Comes in small tubes.

Image


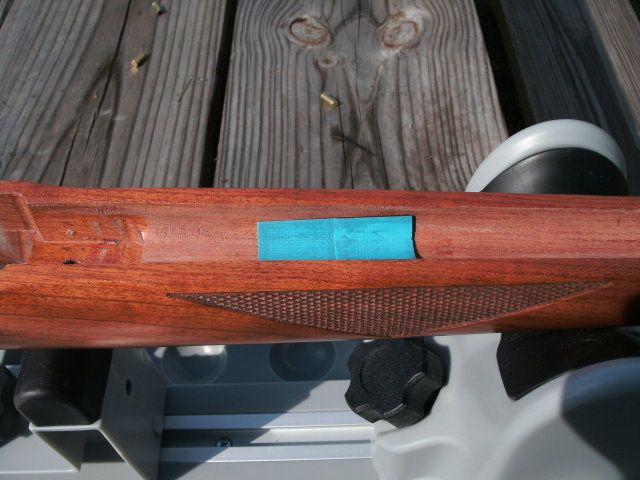
Channel prep. Line channel with blue masking tape to make removal fast and easy later if you want it to come out in two seconds with no problems and no residue. The dabs of putty are to reserve space for screw heads for fore end attachments. Most people will not need that. The pink things are pieces of rubber band to prop the end of the barrel up. You can support it for no pressure or as much up pressure as you want.
Image


Parchment plus rtv. Sorry I forgot to take pics of how much silicone is in the channel. The amount will depend on how much you have or have not free-floated to barrel ahead of time. I have always free floated mine first. The whole idea is to eliminate any intermittent contact of the barrel to the stock and at the same time absorb and reduce vibrations w/o any bouncing off of the bedding that will be worse with hard bedding. That is not to say that it will work better than no bedding or hard betting. That is trial and error and different combinations of whatever will yield various results.

The biggest mistake I have made is not using enough rtv. Use WAY more than you think you need. I mean three times what you think it will take. You are going to trim the excess with a razor later and you cannot over do it.

Lay your strip of barrier material on top of rtv and install barreled action. Tighten t/d screw and let the excess ooze out and cure.

NOTICE the plumber's putty on the receiver tang, barrel, and v-block. Make sure you use enough then add more. You NEED a dam to stop rtv from getting into the receiver bedding area. It helps to wax/grease the putty, barrel etc in that area prior to installing action.

Image


Barrel in wet rtv
Image


Rtv next day. You can remove the action the next day. It will help allow the rtv to cure faster. DO NOT MESS with it at this time.
Image


Peeling parchment is easy and comes off nice and clean in one piece ONLY if the rtv is fully cured. That will vary. Ignore the label regarding cure time. Several days minimum. The longer you wait the better it comes out. PERIOD.

Image


Done.

Image


In this particular version shown done I put a LOT of upward pressure into it for trial and error. It was more pressure than I had ever previously tried. Too much imo. The good part is that it can be cut back and peeled out in sections large or small and if you start at the fore end and work back the net amount of upward pressure is reduced gradually and you will see your poi come down.

I am not suggesting that people who have tuned their pea-shooters for world-beater accuracy should do this. However, it has always worked well for me and I continue to use it until that changes. I will also note that I have peeled mine out a number of times for one reason or another. Mostly to see if I could do better w/o it.
 
#2 ·
Been Curious

Nice write up. Probably will end up in SuperStock Tech Stickie:bthumb: I have watched you do this for a couple years now it seems and have had a question I never got around to asking:

Can the piece of RTV be removed in one piece and re installed at any point. I am not suggesting this is a game breaker one way or another but it has me thinking about another use for this........
 
#5 · (Edited)
Nice write up. Probably will end up in SuperStock Tech Stickie:bthumb: I have watched you do this for a couple years now it seems and have had a question I never got around to asking:

Can the piece of RTV be removed in one piece and re installed at any point. I am not suggesting this is a game breaker one way or another but it has me thinking about another use for this........
Thank you.

YES. You can definitely re-use whole strips or sections. I have a pic of something you will like and hate at the same time. :D

I would gladly mail you a half dozen of them :D but, they only fit ONE stock/brrld actn.

I shot that .106" group at 50yds with a removed and re-used a piece that was specifically made to mimic the African Rose (I think it was that one) epoxy barrel bedding. I don't know if it is coincidence or not. I think I would have gotten the exact same result with fully bedded barrel at that time provided it was one my better efforts. By that I mean the correct amount of upward pressure. It was molded in, got tested, got removed to compare free-float back to back and got put back in. Like I have said many times, even with epoxy bedded receiver with front and rear pillars and td screws I STILL get better results with the rubber tuner than w/o and better with rubber pad/bed than w/o and better w/ both than with one or the other. I will always revert back to whatever actually works regardless of anything else.

In that case, I put a wad of rtv in the channel enough to make a 2" long oval sitting between the middle of the v point bottom of the checkering and the rear most point of the checkering with medium upward pressure to let rtv cure w/o any excess coming out the sides. Neat. Just like your epoxy version.

Just to clear, if I was sure epoxy done just so would be the end all be all I would do it w/o hesitation.

Since I have been doing epoxy bedding, it occurred to me that I can line the channel with blue tape and use epoxy and still be able to get it out if it doesn't work well w/o any mess or work.

I plan to try it someday. :)
 
#6 ·
I don't think that is going to happen. Not that I would like to oblige you. Its just that I know there are too many things going on to try to "prove" any of it definitively to others one way or the other. If I could, and know that it was 100% valid I would.

I put this up because this is the method I used right off the bat (from experience) on my 50th (cheekbone) before I ever shot it. The results, partly due to rubber bedding, was that I had NO PROBLEM making the 25yds 1/4" club w/ factory barrel (not modified) and just a simple Brimstone trigger job. Shot my share of sub moa groups at 50/100 yds with it too. Off jean leg bags.

People wanting something better than nib and be easy, cheap, do some good, and easy to remove should give it a try. People with better methods and results are not going to benefit much, if any, from this method. Trial and error. Mostly error. :D
 
#8 ·
Yeah I was talking about more like full length pieces of black Permatex. Make a set of them with varying thicknesses so you could change them, at will, at the range for instance.

Please understand if you can not do this it does not mean, in my eyes, that the whole thing is a failure. Not at all. I just wondered if you could keep a set of barrel liners of full length and interchange them at any time you liked.

Thinking about it the "liners" would likely be very thin and flimsy in places and would be very hard to store and reuse.

Your second to last picture here looks very much like my barrel pads in both size and placement for a 17" GMHT or KIDD.

I like you write up on this and with the pictures I can easily see it going into the Tech Stickies section at the top of the page. Good job :D:bthumb:
Image
 
#9 ·
Thank you. I was specifically trying to duplicate yours and a few others I have seen with the 2" pad.

Yes I have a bunch of full lengths of used, uhh, well...

Start over :D

I don't throw the ones I take out away. I get no use from them either.

You are so right about thin spots. Plus, I have those two screw holes that cause them to tear into sections when I peel them out.

I don't have pics this go round. I am usually weeks or months lag time between using and putting up photos of stuff. Recent targets being the only exception generally.

I have always thought that the only reason to use the inner tube method was for channels that were not opened up and to be able to tune with location.

My take on it is that the molded version, if used in different thicknesses for trial and error on the pressure is that smaller, sectional pieces will be better.

That 2" pad was actually done in three sections. In that go round, instead of making it one continuous I just did 3 separate globs of rtv. That was the center one. The other two got taken out but never put back in.

We are thinking the same thing more or less. I have also done the same thing you do with inner tube with those heavy rubber bands.

Then times I did not pre-load it w/ upward pressure before molding I usually added the rubber band after the fact to play w/ tuning to find out if it would be better with more pressure.

I change so many things trying different stuff all the time including grip/hold/rest etc its impossible for me to say ONE thing works best. However, I always seem to wind up with some pressure, lots of molded rubber in the channel AND, sorry to say, the toilet plunger ON.

I was really hoping that the rear tang would get me a better outcome w/o that thing than w/ but to date it has helped some or lot depending on details every time.

What is a shooter to do. The toilet plunger is somewhat a-spiritual. Not for looks but because it does not slide in/out of my gun bag. I truly hate that.
 
#10 · (Edited)
Okay,

Rounded up a few and got picture in record time. :D

One is the one shown in place above, one is from my other DSP with .920 channel with contour barrel. The others are from ripping them out to see if I could get some love from free float with this that or other thing in play OR do-overs for more or less pressure OR barrel position changes due to working on the bore/scope alignment etc.

There were plenty more of them. These were on top. A couple were still in my shooting supplies organizer.

It is obvious which one was from the .920 stock.

Image


The 2" mid section pad is the NICEST and EASIEST and can be moved in small amounts fore/aft easily for adjusting pressure. If I get to the point where that is just as good or better than full length I will go with the smallest one that will do.

The BEST outcome from my perspective is to know precisely what the net pressure needs to be and mold in a Permatex piece that does not have to be peeled to move or whatever and pre-load the pressure to that point, mold it, forget it.

I am getting closer to the point.
 
#11 ·
One note that I saw that caught my eye was the inner tube thickness. This not only can be changed but can be very important.

Two ways to do it. Thicker rubber as in racing inner tuber (thin), Thorn proof inner tube (when I moved to the desert from PA in 1963 I had 4 flats in 3 days until my parents sprung for thorn proof tubes!!) Car inner tube and the very thick large truck tubes. Not to mention stacking rubber or as you see here I use inner tube patches for many of mine as they are not only thicker but always HARDER as well. Get a kit from WalMart for $3

Thanks for the answer.:bthumb:

Patch:

Image


These blue ones seem very hard and show up great for pictures!! :D:bthumb:
Image
 
#17 ·
I have pretty much stopped using epoxy for the barrel pad but having said that my two best 100 yard rifles have epoxy pads in them but they also have first run GMHT barrels and I had a great lot of SK Std + so I do not think we can say the pad made the difference.

As I said before my best 50 yard rifle shot 16 straight groups under 1/4" average. It is the same rifle with the same blue rubber pad and aluminum tape bedding as used in that tutorial. When a rifle shoots that well with so little work it is hard for me to justify tearing it apart to put epoxy in it.:eek::rolleyes::eek::D:D
Image
 
#13 ·
This is all gotten me thinking about the tuning screw Old Blades was talking about.

I have a threaded hole... I have an idea of how to make a molded epoxy 'cradle' for the barrel with a divot on the bottom to capture a 12-24 set screw. Gotta make the screw and mold the epoxy which won't take long. I think that is what I am going SCREW with next. :D
 
#14 ·
Okay, I went out and made my 12-24 set screw. Nice. Works. That is to say it lifts the muzzle.

I passed for now on making an epoxy cradle. Just used a piece of rubber cut from one of the strips still lying out from snapping photos. Already molded to fit. Charming. :D

In the long run, I think what I want to try to do is peel out the existing rubber bed (already cut back 1/2 way from last time out) and run it in free float then add pressure with the screw and hopefully tune it into a good place and then use that screw adjustment to hold in a know to work position and mold an epoxy pad/bed in the mid section, then run it w/o the screw and see what gives.

Should be fun. :D
 
#20 ·
Well, I installed and used the tuning screw. I can easily see how people could do both love and hate.

I over-stressed the action. It caused the rear tang screw to have bind on it. When I loosened it up to fudge with things it ripped the reads out of the tang.

Oh well, I only did the tang to see if that was the key to getting better results from free-floated barrel anyway.

It did not. It has been removed.

I used the tuning screw to epoxy in a pad in the usual spot about the same size as the rubber one shown above.

It came in handy. Before I was adding layers of rubber bands and checking tension using the t/d screw to gauge the pressure and then molding the rubber which was okay but one layer may not be enough and two is too much and so on.

Today, I just adjusted the pressure (more like firm support) with the tuning screw until all the teeter was gone with the t/d screw tight. Left it there and epoxied it.

I lined the channel with blue tape to make removing the epoxy pad easier later if it doesn't shoot well this way.
 
#22 ·
Yeah, I would not install a screw just for that. However, if you have the screw installed already, which it was, it is a handy-dandy more precise way to do it. Trust me on that. :)

The epoxy bed/pad under the barrel was a complete and total bust. My instincts told me long ago that would be the case. Now I know I was right.

Was also right to predict a need to remove. Was also right to have used blue mask to line channel.

Undesirable epoxy pad was firmly stuck in place, no problems there, and pried out in one piece with an awl in two seconds. NO PROBLEM.

To date, NOTHING, I have done has equaled, much less beaten just doing a sleeve (no flange) for a front pillar, a steel shim under the back of the receiver, and fully rubber bedding the entire action front to rear EXCEPT under the front tang which, w/o question, has been the easiest, cheapest, and MOST ACCURATE and MOST REPEATABLE results.

That said, I will continue to try to find something to beat it because better is better if you can do it. :bthumb:
 
#23 · (Edited)
Funny how things work. Out of 7 10/22 builds that were either mine or my daughters the 1st, 2nd and 4th most accurate in a general way all had epoxy pads. The #4 has a sleeve just as you describe but the #1 and #2 have no sleeve or pillar.

Those two (one I do not own any longer, Stainless Twin, as I traded it to graycreit who said his wife claimed it the minute she saw it:D:bthumb:) I used a soda straw to make a clear take down screw hole. The entire pad where the front of the receiver rests was Dremeled out close to 3/8 deep and so it has a very solid block of glass reinforced epoxy pad from the vertical face of the action out to the where the vee block would normally clamp. Then the vee block is entirely free floated and then has my epoxy pad in the exact place I show in my bedding tutorial with the remainder of the barrel floated.

My Twins remain the most accurate 10/22s I have built but much of that has to go down to the two GMHT first run barrels that have always been my most accurate barrels.

My most accurate 50 yard rifle is African Rose and it is likely #3 in total accuracy but is definitely the most accurate 50 yard rifle with 19" STOCK GMHT (no chamber work, no muzzle work, no lapping and no Moly Fusion) is on a 1/2" pillar. Aluminum Tape Bedded and inner tube repair pad exactly as shown in the Aluminum Tape Tutorial (same place as I recommend for most GMHT position). This is also the rifle that shot a bug (witnessed at 100 yards), 16 straight 5 shot groups averaged less than 1/4" inch and is my 200 yard cracker shooter.

Mix all that with Ricochet's Tribute that refused to shoot until I put a rubber strip right at the forearm tip (right where Ricochet did his).

Now mix THAT with the success that Chromie had with his bedding method that practically locks the barreled action into the stock and the success you have had with your rubber bedded barrels and what does all this prove??

It proves there is no one perfect way to bed or otherwise accurize a 10/22!! Basically it proves that there are a number of ways to make a SuperStock, SuperSport rifle shoot VERY well!! It proves that the longer we do this the more sense my Signature Line makes!! :eek::rolleyes::D:D:bthumb: :eek:
Image
 
#24 ·
Good stuff. :bthumb:

I find myself having 'broke' things making good enough to go a lot better. :D

In the process of fixing it again I thunk of something so dumb it just might be BRILLIANT.

Not sure I want to try it but I am right there now and its an easy redo if it is a complete flop. That means odds are I will try it. :)

Not going to say what specifically or speculate on it until its done and tested but it is essentially an rtv bedding thing. May never actually do it.

Came on here whilst pondering it and after reading your post above thinking I should do it. :D
 
#28 ·
Good stuff. :bthumb:

I find myself having 'broke' things making good enough to go a lot better. :D

In the process of fixing it again I thunk of something so dumb it just might be BRILLIANT.

Not sure I want to try it but I am right there now and its an easy redo if it is a complete flop. That means odds are I will try it. :)

Not going to say what specifically or speculate on it until its done and tested but it is essentially an rtv bedding thing. May never actually do it.

Came on here whilst pondering it and after reading your post above thinking I should do it. :D
Let me guess.....You are going to put release agent on a 1/2-20 screw and fill the hole with JB Weld and use those threads? I have seen it done on motorcycle engine cases and it WORKED!!
 
#27 · (Edited)
I may need to try that with my old SA 64 match. As far as being done, I haven't returned to the barrel subforum and overall haven't been posting in the 10/22 forums. I realize that none of us really post scientific results, but they are our results and I get very tired of the Monday morning quarterbacking of those. honestly, for me the rimfire rifle shooting (especially the 10/22) has lost some of its luster for me as of the past year or so. sometimes i just want to thin the heard and either put $ into my mustang or a rolex.
 
#30 ·
So I have determined that I do want to try this. I have read the thread a time or two, and am looking for clarification on a couple of points. First off, you like the Ace brand 100% silicone, but also said the black RTV is the best. Any particular brand on the black RTV? Permatex?

You also say that "some" upward pressure seems to work best. Now I know that every rifle is a law unto itself and the only way to know what works on a particular rifle its to test it. However, if you were starting from a blank slate, what would be your best guess (description) of how much "some" pressure to begin testing with? It also appears to me that you seem to somewhat be advocating the approximate location Vincent describes for his epoxy bedding as well. Would this be a true statement?

I know that very likely my amount of pressure and location may be very different than what works with your setups since I am hanging a 6.7 oz suppressor off the end of my barrel. Who knows what that will do to the "tune" of the system.
 
#31 ·
Sorry I didn't see this sooner. Actually came across it by accident.

The 'gasket maker' and/or 'black adhesive' is definitely a harder/tougher rubber compound. It is on the shelf at all auto parts stores.

If you only do a 2" pad under the barrel in the typical 'sweet spot' a $6 tube of permatex is a LOT of rubber and not hard to apply.

However, if you want to be the whole barrel, the caulking gun is the way to go for cheap and easy and among the cheap and easy the ACE beats the other GE/DAP brands hands down.

To date, I lost count of how many I times/ways I have done the rubber barrel bedding and just last week did mine again because I had cut my last one (shown in pics) done full length back to nothing.

I am always experimenting with different stuff and because rubber bedding the barrel is so fast, cheap, easy to do I don't hesitate to try it with various lengths including complete removal to see if free-floating would suddenly be 'magic'.

It is a whole cheaper and easier than buying a new rifle every time I want to try something new. :D

Best of all, if you blue tape the channel bottom first you can peel it out in two seconds and you will never know it was there.

Now I will say that if you don't support the barrel with a wee bit of pressure at the end of the fore end AND make dams with putty at both ends then you run the risk of the rubber oozing too much and then your contact point is not what you intended it to be all the way out.

Just one of those things that if it isn't what you want the first time then simply do it again it is literally NOTHING in time or cost.
 
#32 ·
When you started your thread, I made a full length Pematex pad, for my T model.

After shooting it, I then took it out. Cut it into 4 pieces, and numbered them, so I knew which part of the channel the came from.

After many trips to the range. I ended up with 2 pads about 1 1/2 long.
One in front of the take down, and one about the middle.

Anyway, I just wanted to say , Thanks for the tip.
Once I found the right placement, they made an improvement, and if it wouldn't have helped, all I had to do was pull them out.
I'll try things tat are reversible.
 
#35 ·
You are welcome, of course.

Very nice on using various pieces and tuning. :bthumb:

Pictures of how it ended up? OR, how about pics of how it is now and the targets that go with it?

As always, when I talk about stuff I did, good bad or otherwise, I hope to find out how others did it different/better/whatever.
 
#33 ·
Well I did mine this weekend. I ended up with about a 2" pad, not sure if it is in the sweet spot or not. I guess in a few days we will find out. I used blue painters tape underneath, and black RTV. I also did bed it with some pressure on the tip. Who knows if it is the right amount of pressure or not. This evening it will have been curing for 2 days. So far my parchment paper does not want to peel out at all, so that may become a permanent part of the rubber bedding.
 
#37 · (Edited)
I have yet to not be able to peel the paper or plastic wrap off but at the same time it is not exactly fall off either.

My 'tip' would be that I lube my finger with Frog Lube (love that stuff) and rub the top of plastic or paper a bit vigorously. The lube prevents the finger from grabbing and thus ripping the liner to be removed and the rubbing seems to loosen it up. I can only assume its a combination of heat and gentle disturbing of the surface tension. Rubber does tend to 'grip' stuff it is contact with even if it is not actually 'stuck' or proper adhesion. I also will say I peel it carefully and slowly to do my best to keep the paper/plastic in one piece but if I don't have it started as in it tore off then I pick at the edge with a razor knife. The rubber is self-healing as long as you don't rip the skin off it.

Additional note... if rubber is not fully cured inside it will peel off the top skin of the rtv to expose the uncured inside.

Also... The Permatex has the most adhesion by far of the bunch of the various silicone rubbers I have tried.

I have on several occasions skim-coated a bedding that wasn't as good as I wanted it after it was cured and peeled. It will stick to itself nicely with no adverse effects I have noticed.

I see no harm in leaving parchment paper or stretch wrap stuck to the rubber. However, I live in a dry climate, take my barreled action out a LOT and always put a fresh coat of Frog Lube on both barrel and rubber and if it was paper or plastic I would do the same as the Frog Lube will displace moisture.

As for the 'sweet spot' I am calling that area between the v-block and 2-3" forward where just about everyone says that is the ideal barrel bedding.

I will say this... the 2" pad I show in the photos just forward of the v-block was what was installed when I shot my best group ever at 50yds. 4rd group format for 13mm challenge card. Group measured .106". And that was with TAC-22 ammo which has never been the most accurate of the ammo I have used in that rifle. By no means the worst either.

Do I give credit to the 2" rubber pad. NO!

However, OBVIOUSLY... it could not possibly have hurt either. :D

I give half the credit to a run of luck on 4 well matched rounds plus the perfect wind conditions for the duration of the group. The other half to a combination of my engineering on my rest/bags/rider plus a brief and I do mean brief momentary mastering of grip/hold/timing/trigger pulling that I KNOW was nothing less than excellent. I have spent a good bit of time trying to RE-master that technique but so far it is more than a bit elusive.

For one group it all came together. Luck being defined as when preparedness meets opportunity. Conditions were perfect and I was prepared to be perfect at that time.

Would it have been just as good of a result with different bedding or free floated?

I will never know. :D