A Tutorial as requested by a number of people.
First let's get a couple of things out of the way so we do not have to argue about them later.
I am reticent to say I "invented" this process but when I first started doing it about 2002 I had never heard of it and I was a year from finding RFC. For a long time after coming here I was doing this with new stocks but had not mentioned it until I told Ricochet about it. If you knew Ricochet he was not going to just leave it there and when we had the SuperStock forum he did every one of his rifles by one variation or another. If you have seen his targets it probably worked for him:bthumb: But it is highly likely other people had tried the same thing.
I normally see this process as a step between no bedding and full glass bedded rifles. Good old Ricochet saw it as an end process meaning he was happy to stop with the tape. I even sent him a glass bed kit but he never got around to using it in the 2 years or so he had it. I usually think of it as a fast way of getting a rifle to shoot to 90% of what is capable of if completely and correctly glass bedded.
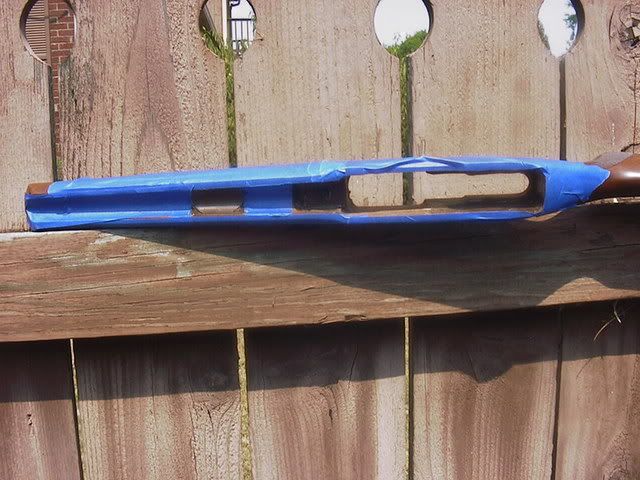
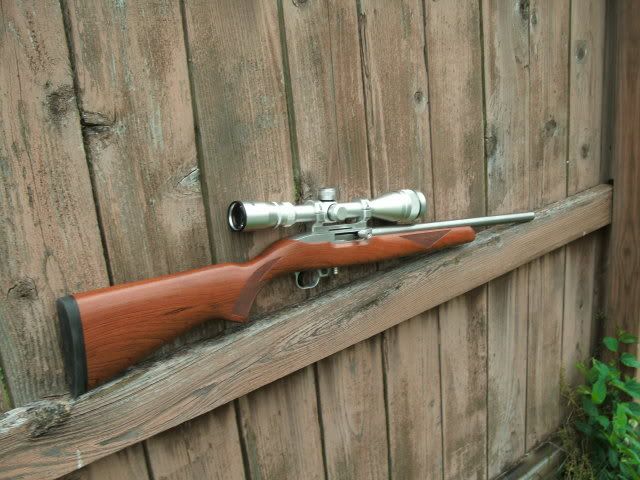
How well can it work? The rifle Riocochet's Tribute:
![Image]()
Made the SuperStock 1/4" Club, The 50 yard 13mm Funshoot and nemohunter's 100 yd MOA Game all while being tape bedded.
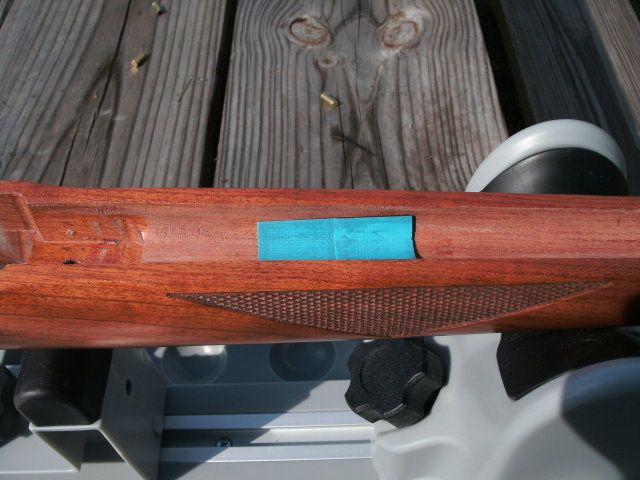
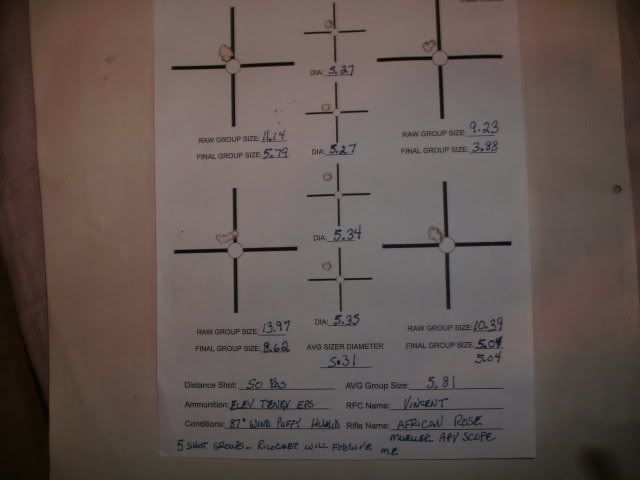
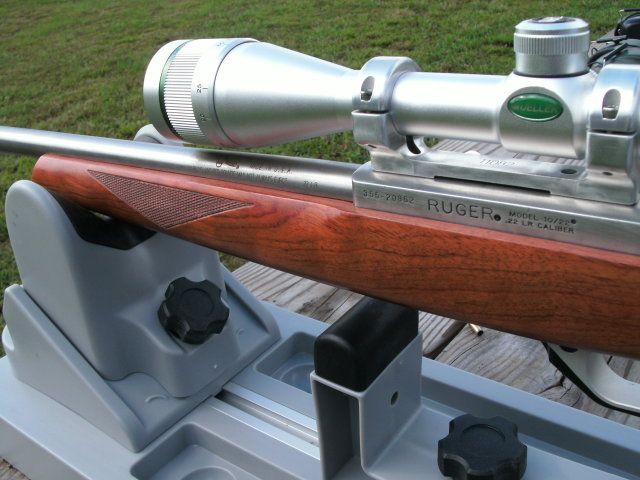
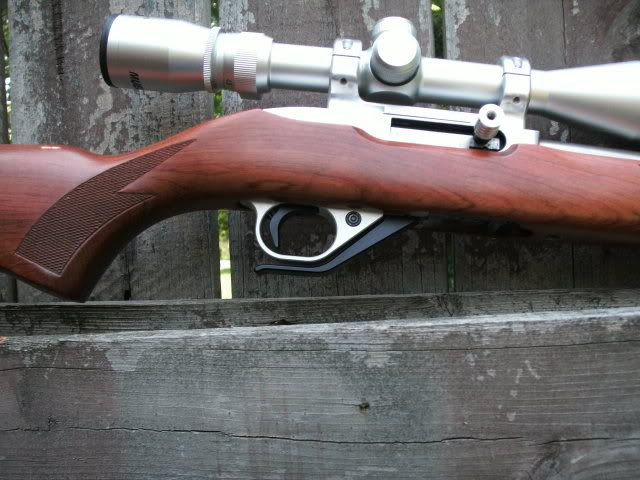
Further "African Rose" made the 1/4" Club and shot this amazing 50 yard target for the 13 mmFunshoot while tape bedded:
![Image]()
![Image]()
![Image]()
So I think that points out that it works. Does it work as well as "glass bed"? I do not think so but it is very close if you do it right and it is perfect for people like my friend Ricochet who seemed to be terrified of glass bedding a rifle or that, like him, changes stocks around often and is never really done with a rifle. It is certainly easier than glass bedding, takes almost no prep time where glass bedding is preparation intensive to say the least!
Why do we bed stocks at all? Because from the factory there is a sloppy fit. Due to this sloppy fit every time you fire the gun it vibrates and these vibrations make the action move around in the stock. It the relationship between stock and action is not the same for every shot accuracy will suffer. To over simplify a rifle is accurate because as the barrel vibrates the bullet will leave the barrel in the same place of the vibration every time. If the barreled action is moving around in the stock it is impossible to create nearly identical vibrations and if the barrel is not vibrating the same it is impossible for the bullet to leave the barrel in the same place on the vibration. When we bed a rifle we are trying to marry the stock and barreled action as closely as possible.
So let's back up just a minute.....pillar bedding, What is it and why do you do it? First of all let's separate pillar "bedding" because pillar bedding is not truly bedding at all. It's MAIN function is to make it impossible to crush the wood or other stock material. Some people will argue about this and they are welcome to their points of view. Correctly putting pillars in a stock can not be a bad thing but it has little to do with bedding the entire action and possibly parts of the barrelwhich is what this discussion is all about.
Bedding a rifle is done to make a microscopic fit between the barreled action and the stock. In it's extreme like centerfire bench rest rifles the two are permanently glued together with epoxy That is a little extreme for us. "Glass Bedding" as it has been called is using various types of epoxies with either fiber glass or powdered metal fillers to make the stock and action as closely fitted as possible. A release agent is used to keep the two from being permanently locked together. If you would like to see how I do this you can find that information here
http://www.rimfirecentral.com/forums/showthread.php?t=195425
That is my version but like many other things there are many other was to do it. I would NEVER argue my way is best. It has been used successfully by a number of RFC people but there are variations on a theme and more than one way to skin a cat.
Finally to this topic, aluminum tape bedding. With this very thin aluminum tape I cut many "shims" made of this tape and stack them until it is almost impossible to get the action into the stock. I shim both sides and the back of the action. I may or may not shim under the take down tenon in the front of the action depending on if there is sufficient contact at the torque I plan to use on the front take down. Usually a few layers is a good idea. After a while this first application of tape is going to compress due to the glue on the back of it so at some point it is a good idea to go back and add a couple more shims to the sides at lease and possibly the back and tenon. I should take one step backward at this point. Before you start adding the shims of tape take some black electrification's tape a wrap it around the barrel somewhere about half way in it's length with enough tape that it will just barely go into the stock. This helps insure that you bed the action evenly.
Notice I said stack them and implied on the action but I have done it, in fact started doing it, by stacking them in the stock. Now most go onto the action but some, like in the take down area, I still put them on the stock. The tape sticks better to aluminum or steel. The only prep needed is to degrease the area so the tape sticks very well.
Okay I need to take some pictures and get them loaded into Photobucket. Because it may be a day or so until I can complete that process I am going to post this but close it because many questions will be answered by the pictures. Got a late start today and tomorrow and Friday will be loaded with Doctor visits I will get them in here as soon as possible.
First let's get a couple of things out of the way so we do not have to argue about them later.
I am reticent to say I "invented" this process but when I first started doing it about 2002 I had never heard of it and I was a year from finding RFC. For a long time after coming here I was doing this with new stocks but had not mentioned it until I told Ricochet about it. If you knew Ricochet he was not going to just leave it there and when we had the SuperStock forum he did every one of his rifles by one variation or another. If you have seen his targets it probably worked for him
:bthumb: But it is highly likely other people had tried the same thing.I normally see this process as a step between no bedding and full glass bedded rifles. Good old Ricochet saw it as an end process meaning he was happy to stop with the tape. I even sent him a glass bed kit but he never got around to using it in the 2 years or so he had it. I usually think of it as a fast way of getting a rifle to shoot to 90% of what is capable of if completely and correctly glass bedded.
How well can it work? The rifle Riocochet's Tribute:
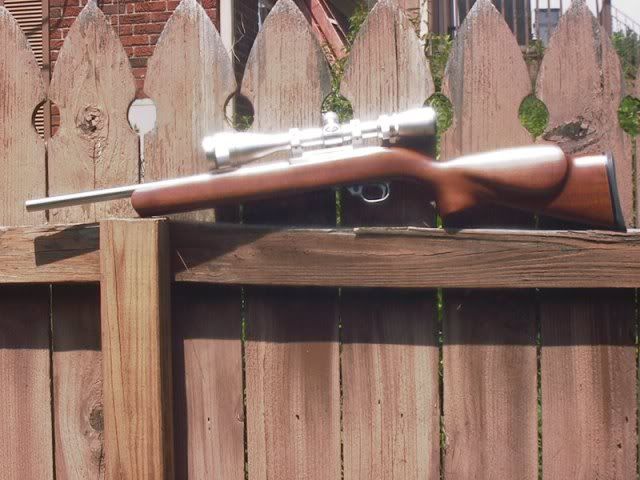
Made the SuperStock 1/4" Club, The 50 yard 13mm Funshoot and nemohunter's 100 yd MOA Game all while being tape bedded.
Further "African Rose" made the 1/4" Club and shot this amazing 50 yard target for the 13 mmFunshoot while tape bedded:

So I think that points out that it works. Does it work as well as "glass bed"? I do not think so but it is very close if you do it right and it is perfect for people like my friend Ricochet who seemed to be terrified of glass bedding a rifle or that, like him, changes stocks around often and is never really done with a rifle. It is certainly easier than glass bedding, takes almost no prep time where glass bedding is preparation intensive to say the least!
Why do we bed stocks at all? Because from the factory there is a sloppy fit. Due to this sloppy fit every time you fire the gun it vibrates and these vibrations make the action move around in the stock. It the relationship between stock and action is not the same for every shot accuracy will suffer. To over simplify a rifle is accurate because as the barrel vibrates the bullet will leave the barrel in the same place of the vibration every time. If the barreled action is moving around in the stock it is impossible to create nearly identical vibrations and if the barrel is not vibrating the same it is impossible for the bullet to leave the barrel in the same place on the vibration. When we bed a rifle we are trying to marry the stock and barreled action as closely as possible.
So let's back up just a minute.....pillar bedding, What is it and why do you do it? First of all let's separate pillar "bedding" because pillar bedding is not truly bedding at all. It's MAIN function is to make it impossible to crush the wood or other stock material. Some people will argue about this and they are welcome to their points of view. Correctly putting pillars in a stock can not be a bad thing but it has little to do with bedding the entire action and possibly parts of the barrelwhich is what this discussion is all about.
Bedding a rifle is done to make a microscopic fit between the barreled action and the stock. In it's extreme like centerfire bench rest rifles the two are permanently glued together with epoxy
That is a little extreme for us. "Glass Bedding" as it has been called is using various types of epoxies with either fiber glass or powdered metal fillers to make the stock and action as closely fitted as possible. A release agent is used to keep the two from being permanently locked together. If you would like to see how I do this you can find that information herehttp://www.rimfirecentral.com/forums/showthread.php?t=195425
That is my version but like many other things there are many other was to do it. I would NEVER argue my way is best. It has been used successfully by a number of RFC people but there are variations on a theme and more than one way to skin a cat.
Finally to this topic, aluminum tape bedding. With this very thin aluminum tape I cut many "shims" made of this tape and stack them until it is almost impossible to get the action into the stock. I shim both sides and the back of the action. I may or may not shim under the take down tenon in the front of the action depending on if there is sufficient contact at the torque I plan to use on the front take down. Usually a few layers is a good idea. After a while this first application of tape is going to compress due to the glue on the back of it so at some point it is a good idea to go back and add a couple more shims to the sides at lease and possibly the back and tenon. I should take one step backward at this point. Before you start adding the shims of tape take some black electrification's tape a wrap it around the barrel somewhere about half way in it's length with enough tape that it will just barely go into the stock. This helps insure that you bed the action evenly.
Notice I said stack them and implied on the action but I have done it, in fact started doing it, by stacking them in the stock. Now most go onto the action but some, like in the take down area, I still put them on the stock. The tape sticks better to aluminum or steel. The only prep needed is to degrease the area so the tape sticks very well.
Okay I need to take some pictures and get them loaded into Photobucket. Because it may be a day or so until I can complete that process I am going to post this but close it because many questions will be answered by the pictures. Got a late start today and tomorrow and Friday will be loaded with Doctor visits I will get them in here as soon as possible.