Rimfire Central Firearm Forum banner
  • Whether you're a greenhorn or a seasoned veteran, your collection's next piece is at Bass Pro Shops. Shop Now.

    Advertisement

Woodstocks Amazin' Stock Finish & photos

488K views 849 replies 216 participants last post by  userid1960  
#1 · (Edited)
Image


Image


Image


Image


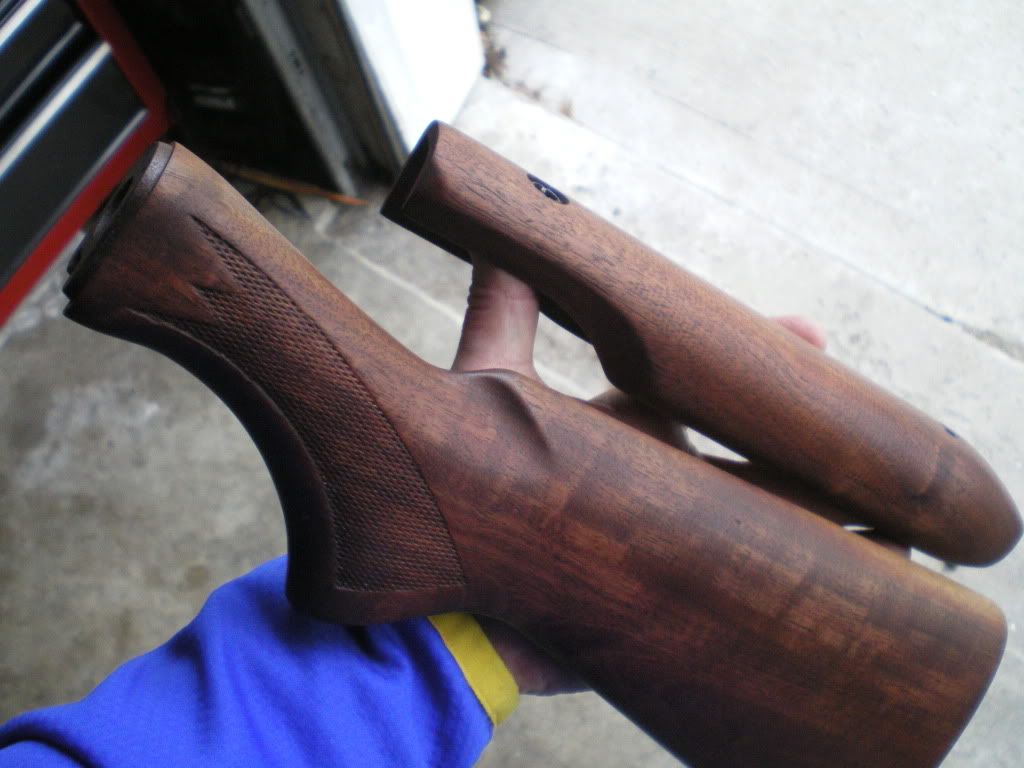
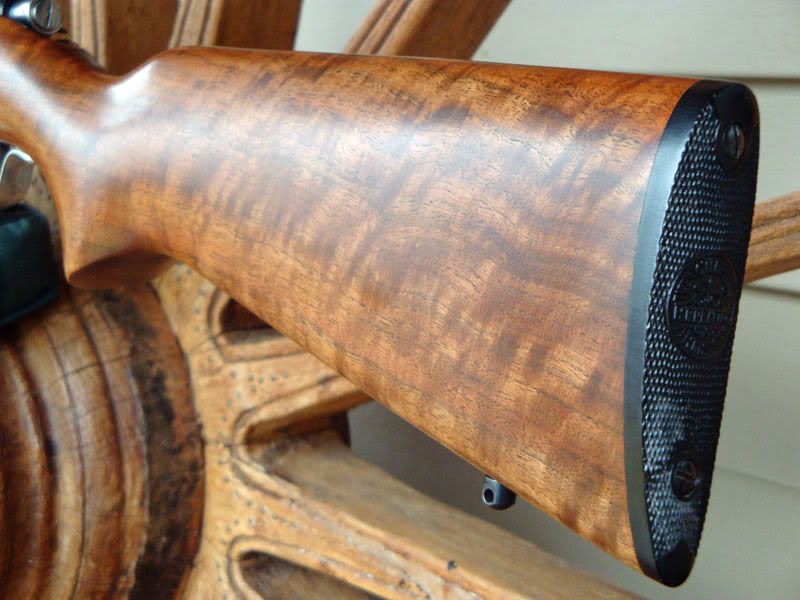
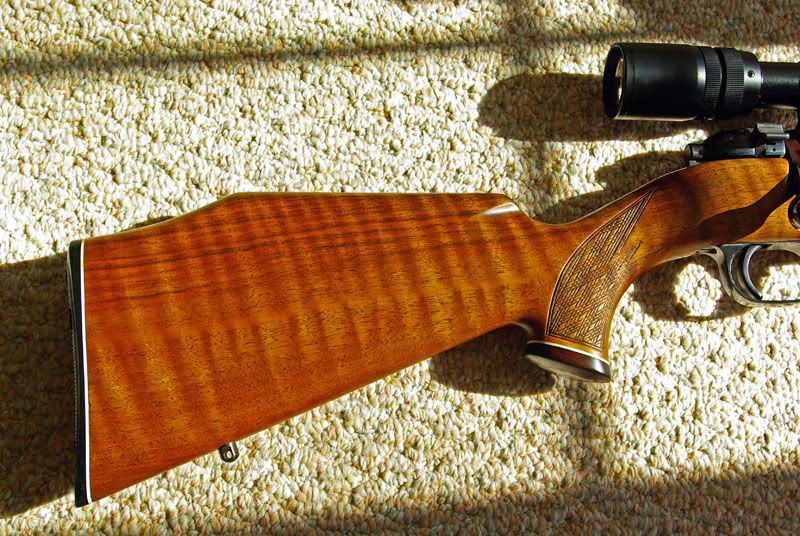
Ok, grab a cup of coffee and sit back. The top three photos are of my Winchester 72A which had a really good finish when I picked it up, for $200, but age was hiding the beauty of the grain. The other was for a customer.

Brief History:
I've used this process for four years now on Walnut and laminated stocks. This accounts for about six stocks per year. I've been doing them for our local gunsmith, who is a very discriminating individual. I do his own personal guns as well as his customers. There has never been a single problem with any of these, no matter the weather.

Benefits
No worries regarding humidity/drying time; runs, drips, errors or overlaps that a traditional Tru-Oil only finish can leave requiring sanding out, the end result is a finish smooth as a baby's bottom.

Step One; Preparation
Strip old stock, use a wet cloth over dents and use the tip of a steam iron, which swells the area around the dent and lifts out just about all except the deepest. Be aware that any sharp edged dents will probably require deeper sanding below the dent and then blend into the surrounding area. I use 220 grit sandpaper (always with the grain), primarily to avoid leaving deeper sanding marks and scratches. I constantly will backlight the stock turning it to view along the wood for any imperfections. When the desired smoothed finish shape is there, I go to 400 grit, then 800 grit.

Now de-whisker. With a wet cloth wipe down the entire stock and let dry. This raises small fibers or "splinters" which I now lightly sand off with 800 grit. Now lightly rub the stock down with 0000x steel wool.

Step Two; GO NO FURTHER!
This is important; check your work, use the light source. It is what it is, don't scrimp on your quality now and be satisfied with your prep results. The next part is the easiest.

Step Three; The Magic Elixir
Here's what you've waited for..,the formula!

I use Birchwood-Casey Tru-Oil and ArmorAll. Other brands of tire shine will also work, but I usually have enough ArmorAll around. I do not use grain filler or stain unless the stock really begs for it.

Spray on a coat of ArmorAll, rub it over the entire stock and wipe off the excess. Now rub a couple of fingers worth of Tru-Oil over the ArmorAll in all directions, but initially across the grain to fill the pores. (Doing sections at a time intially is best because you can see where you've been.) Once some coats have been built up, you can do one full side of the stock at a time. Rub briskly with palm and finger tips until the surface loses its tack and feels like glass. This may take 5-10 minutes but subsequent coats will go even faster. The first coats will appear dull, but subsequent coats will start to gloss up .
( EDITED:Added note thanks to Tom Beck suggestion- Every single coat uses ArmorAll and TruOil combination)
I will put on as many coats as required to give the perfect flat surface finish. Don't rush the coats or thickness application or you'll be rubbing longer.

As I continue once the sheen has been built up, I often lightly buff with 0000x steel wool. This gives a bit of bite for additional coats.

I can put two or three dozen coats on in a day and typically finish a stock in the same day and use it immediately. When I'm satisfied with the final coats I will often put a good furniture polish on a small piece of 0000x steel wool and gently rub it on in the direction of the grain, buff it off and add pure wax and buff again.

For a flatter sheen, the last step is a light 0000x steel wool buff without wax, your choice.

Why does this work?
I believe that there is a chemical reaction or catalyst occuring between the ArmorAll and the Tru-Oil that is much the same as a two-part epoxy that strengthens, hardens and gives such a rapid working/drying time. Don't panic; the process starts working only when you start rubbing the mix together and in.

I know this was long winded, but I hope it gives you greater satisfaction in a much shorter amount of time. Repairing small nicks later on is a snap, steam and/or sand the area, apply your "elixir" and it'll blend right in. Thanks for your patience and please feel free to ask about anything you feel I may have skipped over. Start with a beater stock if you have doubts, but don't
have any fear, this works like a charm.

I look forward to hearing from you after you give this a try and also please submit pictures/comments of your results.

If you don't like your results, I'll refund your money...,oh wait a minute, you didn't pay for this tutorial.
 
#4 ·
Related to my first post about this process, there was someone who questioned the use of ArmorAll ;so I did a web search and found this quote from "The Highroad".

"Armor All (yes, the kind you use on tires and your dashboard) will cause Tru oil to harden almost immediately and bond to the coat beneath it. I would spray into my hand and rub the whole stock down with just the film on my hands. It does, however, dull the finish just slightly so don't do this for final finsh. It helped for the wiping on/off phase to get the nice translucence."

I don't have a problem with sheen I guess because I put Tru-Oil over the ArmorAll.

I discovered this for myself when I had a full Tru-Oil finished stock that I'd put ArmorAll on as a protectant and then went back and touched up a spot with Tru-Oil over it and had a happy accident.

:F
 
#7 ·
Some answers.

"Do you only apply the ArmorAll once, or between every coat of Tru Oil?? You only state it being used first, and never again. Just wondering how the following applications of Tru Oil will harden with this if its not used every time you apply the Tru Oil."

Sorry, my bad! Yes, ArmorAll between every coat.

"Wow... can't argue with those nice results. Thanks for the info and details.
How does it do on beech? I'm wondering if the ArmorAll darkens up the beech at all, or if the result is very blonde?"


Ohhh man, I'm not too fond of finishing Beech but I have. No, it won't darken it much. If you need to darken Beech, I've used Analine Dye which is a powder that you mix with Wood Alcohol and water .Follow the mix directions on the Analine (a true dye that comes in different dye colors)very carefully, but it's easy. It's typically available from a good wood workers supply house, maybe even Brownell's. Then the elixir once that's dried good.
 
#17 ·
...If you need to darken Beech, I've used Analine Dye which is a powder that you mix with Wood Alcohol and water...[/B]
I've used these dyes on pistol grips with very good results. They will tint Tung oil, polyurethane varnishes, Linseed oil, and I suspect Tru-Oil, or any petroleum base finishing solution. The English Red on nicely figured dark walnut is stunning. These are concentrates, so just add a few drops to a dish of varnish solution until you get the color you want, then test it on a scrap to see how it transfers to the wood. With light woods you may need to add dark wood stain, too [clear, not the pigmented stuff which is cloudy], to darken the Red. I get the color on with the first or second varnish applications, then follow with untinted product for the final rubs for a deep, rich finish.

http://tinyurl.com/ydsc4xp
 
#9 ·
Both of those rifles look great! Especially the finish on your 72. I personally like a non-gloss finish on a good rifle, and yours is perfect, IMHO.

Your 72 has got some real nice woodgrain, too. Very nicely done! I may have to try that on the model 69A. It's a hunting rifle already, not a collectors piece.....so refinishing it won't hurt a thing.

Thanks woodstock, for sharing this. :bthumb::bthumb:
 
#12 ·
To all thus far, thanks for all the kind comments.

I'm glad to have been able to provide this info to such a wide audience ...,and a dedicated one.

I'll keep monitoring this thread in order to answer any questions that may come up...., at least until its "shelf life" is up.

I've tried to submit this method at least twice to the "Tips and Techniques" category but it has never popped up.

Does anyone know if this category is now defunct? The last post was in 2005.

:F
 
#13 ·
"Zoned" was gracious enough to research the compatibility of Tru-Oil and ArmorAll and he states:

"I looked up the MSDS info for Armor All and it's Dioctyl adipate [a plasticizer] and Polydimethylsiloxanes [silicon]. As far as I know, Tru-Oil is a synthesized oil which hardens like a varnish. Both products probably "set up" in a similar manner and it appears the blend is an agreeable handshake."

Thanks Zoned!

:F
 
#16 ·
I was in the middle of stripping and sanding a Remington 552 DBl this afternoon when I found this post somehow. I had just put on one coat of Tru Oil and was letting it dry overnight when I found it. I sanded the first coat down to wood again (nearly) and went with your method while watching TV. I was done start to finish before the movie was over. 6 - 8 coats maybe. I figured out the method, You have a thick movable mass of nearly dry finish and you just keep massaging it into the woodgrain until it's level, truly "hand rubbed". I steel wooled it down to satin and rubbed it down with a rag for a while. I may do more on it tomorrow after it dries over night but it looks like it may be done! I will try to post a photo tomorrow. The grain is unbelivable! Looks like a high dollar stock!!!
 
#18 ·
tnsnakebite asks:
"Woodstock, what have you found to be the best finish stripper and maybe some tips? Thanks for this post."

Best stripper? Usually the ones they claim are the most toxic/flammable like Zip Strip The newer ones haven't had the "bite" like Zip Strip. Just follow all precautions, do it outside on newspaper, gunk it on heavy and let set as instructed. It'll take up everything except deep oil. I don't don't what will lift out deep oil penetration (anyone?).

As to a Browning type finish, :dogrun:I haven't done this yet but if requested to, I'll go to Brownell's, I understand they have a product, but expensive.


C.C, comments
"Woody old man: Thanks for your efforts. That Winchester is truly amazing! I am trying to work up enough nerve to refinish my 77-22 stock, and you have added to the impetus. Live long, and prosper!"


Do not fear for we are with you.;)
See other post in here from Chris597


:F
 
#19 ·
woodstock63,
Last week I refinished a laminated stock with Tru-Oil, it's OK but after reading about your finishing method I'd like to lightly sand with 4/0 steel wool or 800 grit and use your method, am I missing anything?
Did I read correctly that ArmorAll over Tru-oil will result in a "duller" finish?

I'm really exited about trying your method.

Don
 
#20 ·
Don,

Because you have Tru-Oil on it already, as long as it is dry and there are no rough spots you want to sand out you should be just fine by buffing it down with 0000X steel wool first.

Apply Armor-All with hand & fingers, wipe off excess and then apply small amounts of Tru-Oil over that briskly rubbing in with palm and fingers creating some friction/heat. Because you have a finish on it already, you can easily do a side at a time

After 5 minutes or so you'll feel the dry/slick surface and then you can keep going the same way...,Armor/All-Tru-Oil, etc., etc. until you end up with what you're happy with. The beauty of this method is really not having to sand out thick areas of dried Tru-Oil. It drys so fast that it doesn't have time to collect dust or dog hairs.

I finished two thumbhole stocks last week, complete from sanding to use. They turned out beautifully.

As a footnote, I didn't really mention this in my "recipe" post, but I always use a wood finishers Tack Cloth to pick up any dust/debris before applying each coat.

:F
 
#22 ·
Woodworker.com sells the JE Moser's aniline dye in about 40 colors and you can get alcohol, oil or water based in powder from. I love the stuff for mixing with Birchwood Casey Walnut stain (I use the water based dye) and getting fore and buttstocks on lever guns to match, since they frequently don't. It is also the only way to get Maple or Beech to look like dark walnut or mahogany....unless you want a natural colored maple or beech stock. I'll finally get off my butt and sign up for Photocucket and post some dyed maple stock pics.
9 fingers
 
#23 ·
This is truly the coolest and wildest idea I have read in mnay years of perusing woodworking !!
I was thinkign "fish eye"...but nooo, you just have to go and set the bar higher!! :bthumb:

Must be similar thing as the CA glue and BLO finisihing method in woodturning... completly different materials that just work prefectly.
 
#24 ·
As a footnote, I didn't really mention this in my "recipe" post, but I always use a wood finishers Tack Cloth to pick up any dust/debris before applying each coat.

:F[/QUOTE]
woodstock63,
After lightly sanding with 4/0 steel wool, I brush the inletted areas with a old tooth brush, then wrap a small magnet in a clean piece of cotton fabric, wiping down the entire stock including the inletted areas, then wipe it down with a "tack rag". You'll be amazed at the amount of steel wool slivers the magnet will remove.

Thanks for your advice.

Don
 
#25 · (Edited)
Image


Sorry I have been gone all day. Here is last nights work, put on many coats of Tru Oil and then steel wooled it all in an hour and 15 minutes time. It is more of a satin finish than normal. It is also a darker than normal. I think it seems to bring out more wood highlights than Tru Oil by itself. It was dry enough to handle and reinstall on the gun last night. 90 minutes turn around time! Like I said before 6-8 coats.

I will touch up with Steel wool tonight and either put on a final coat or just a coat of wax maybe. The wood has a "polarized look" btw, The dark wood grain spots shown in this photo are not visable from a straight on angle, they shift patterns as to how the light hits it. Kind of like pearl paint on a car?

Yes there is one low spot I didn't get raised in the wood right in the middle of the stock. I will try to fill that in some more. It's tiny but shows up in the photo.
 
#27 ·
Chris,

Good job. I like the color and grain.

Step back and take a look at it in a couple of days and if you want to gloss it up more, no big deal, just keep adding coats.

A duller sheen is generally indicative of the wood still taking in the "mix" thru open grain.

Additionally coats (easy enough now, right?) will continue to add gloss. It's nothing for me to put on two or three dozen coats if the wood demands it. My 72A probably had that many layers.The more coats, the easier each additional coat is. The last coat is then softly buffed with 0000X stl. wool to desired matte finish.

I never did mention checkering which is an area I like to avoid rubbing for obvious reasons. 1.) you end up forcing the mix into the checkering filling it up. and 2.) I don't want to reduce the crispness of the checkering by burnishing.

I will typically spray a small amount of Armor-All into the checkering, worked in gently with a toothbrush and use a turkish towel to blot up the excess, brush a small amount of Tru-Oil over it and take a very soft brush (like a shoe brush, and buff it rather briskly. Then hand rub the excess that will fall outside the checkering.

I haven't had any weathering problems because you're adding this step for each layer.

It sounds like you're pleased with this method of finishing. Nice job.

:F
 
#32 ·
:eek:I'm sorry, those two T.H. laminates were for customers of my gunsmith and they went out last week. I'm really lax with photos I guess because I take this stock finishing for granted and the work I get is by word of mouth. I don't advertise to get it. I am retired, we live in the middle of 20 acres, 2 miles from a town of 41 people and 12 miles from a university town. Not quite the boondocks but close.

I do these for friends, myself or my gunsmith and it does keeps me hopping with everything thing else I have going on.

I had ordered a CZ550FS in .243, it came in and the stock was terrible, I contacted CZ, never received a response so the next week I stripped and refinished it, nothing to write home about as far as grain characteristics but at least the pores have been leveled out. I mention this to encourage people that with the "Elixir" method, "have no fear".

What I learned on laminate; it's harder to prep due to soft/harder grains (use a backlight to check constantly to avoid low spots, "pencil round" severe edges so end grains don't get caught and chip. All butt ends and inner curves have to be sanded very smooth (small imperfections will telegraph) and end grains will darken more. This is a case for Armor-All a coat or two first to seal and then do the "Elixir" method. My learning curve. They did turn out very nicely though.

To MALS: Looks great and I'm glad everyone is seeing the value in this finish. The point that everyone that has tried this has been that it brings out a translusence and gives the stock a high end look. Exactly right on. The more coats, the better. They take such a small amount of time for each one that it's worth it.

To everyone: Send photos; before and after, plus close-ups if you can. This will really illustrate to others as well as anything.