Rimfire Central Firearm Forum banner
  • Whether you're a greenhorn or a seasoned veteran, your collection's next piece is at Bass Pro Shops. Shop Now.

    Advertisement

Portable shooting table for my CZ's

13K views 60 replies 31 participants last post by  David Dyke  
#1 · (Edited)
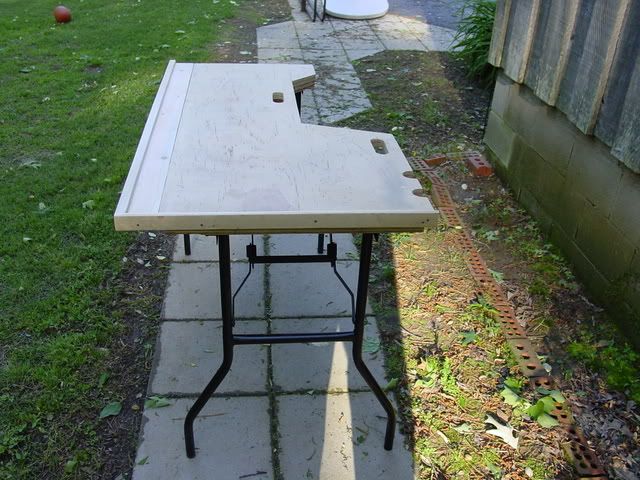
This portable shooter's table is a work in process. I'll post more pics here as things move forward.

I like to take my CZ's out to a place East of San Diego called Orosco Ridge and shoot at paper. It's part of Cleveland National Forest. I've been increasingly wanting to get a really solid platform to shoot from so I can wring the best out of my CZ's. That's the motivation for this project.

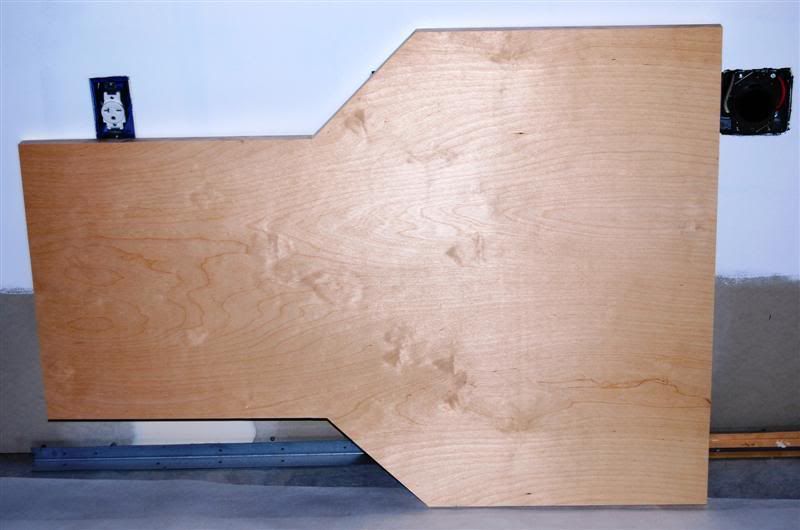
I cut the table top to size this afternoon. Some assembly required. :)

Image


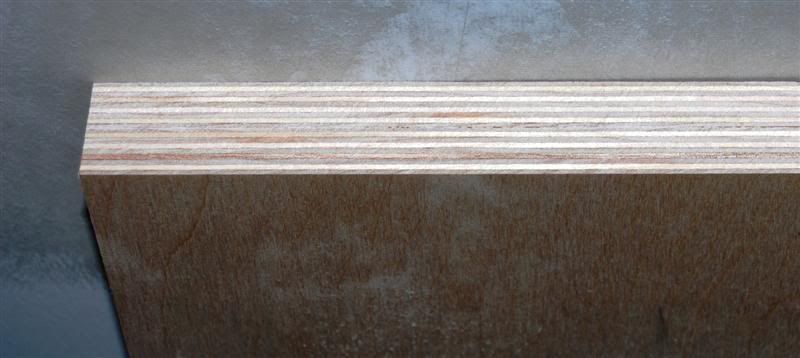
Here's a edge view of the baltic birch plywood I used. I glued two pieces of 1/2" birch ply together to get a solid 1" thick table top.

Image


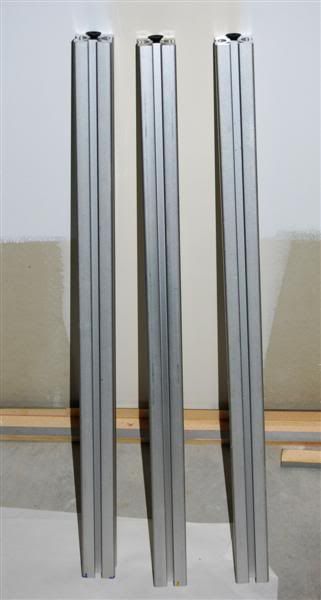
And here are the legs. They are extruded aluminum. (It's scrap material I found that was just what I needed. Better to be lucky than good sometimes.)

Image


And special thanks goes out to bjkearns for sending me a link to a similar shooting table to get me pointed in the right direction:
http://www.larrywillis.com/shootingbench.html
 
#5 ·
My version

Space saving design, no lefties around. Been meaning to put a piece of trim on the right side, (re-saw a 2X4 to leave a lip to keep tools and such from rolling off), just have not gotten to it. Folds up and stores next to the mower in the shed.

Image
 
#9 ·
I had the individual legs on mine at first. Took a set of folding table legs & installed them & feel it is the better of the two types. When folded up they also give you something to grip when carrrying & there are no extra parts to carry.
 
#10 ·
There was a guy on this forum that was selling some real nice ones about 2 years ago. I bought one from him and am very satisfied with it. It used the folding legs that are usually used on those 6' or 8' tables. It is very sturdy and folds up in a nice compact package. He offset the mounting area under the table so that the folding legs fold on top of each other. As I recall he had the dual side, which I bought, and the one side table.
 
#11 ·
Finsihed

This thread got me moving, I finished up the side board and put a retainer lip on the front.

Image


Image


Image


Like everything else of mine, it was a work in progress. I had a cheaper set of legs, had cut one set off and turned them in together to make one leg, thinking three legs would be better than four for leveling up, but it was too wobbly. Switched them out for a set of EBCO legs, much better, American made. They were wider than the first set, so I had to scab on to the rear to mount the new ones. With the notch cut out, I had to offset the rear base, which required adding some width to protect the folded legs, so I cut out to match bench thickness on a 2X4, and left a lip, which works better, keeps screwdrivers and such from rolling off.
 
#12 ·
nice job Worriedman

Write - edit - rewrite - edit - rewrite.........that's the way it's done.

I'm curious, what are the two semi-circular cutouts for? (rifle rests?) And, any idea how much that bad boy weighs?! - Bill
 
#13 ·
The cutouts are for leaning a muzzle loader whilst loading. Keeps the barrel from slipping. Also lets you stand a rifle there while shooting a different one.

I would say about 100 lbs., bench top is 3/4" with 1/4" glued for a full thickness of 1". I used the cutouts to span the bottom for the legs. It has some mass, but is solid!

Next thing is mounting some wheels on it to pull out into the field.
 
#14 ·
Here's one I built 15 or so years ago. Saw one in a catalog but bucks were scarce so I scrounged some folding legs & used plywood & built my own from pix in the catalog. Used it for several years but eventually decided the legs were too short for comfort on the built in seat, & the top needed replacing. I obtained some metal stock similar to the legs, welded on 6" extensions, replaced the top & now it's much better - weighs around 30lbs, easy carry with legs folded, very stable - 3/4" plywood needs no additional support.

Original bench - legs too short for comfortable shooting
Image

New bench w/longer legs
Image

MUCH better
Image

Not absolutely flat but pretty compact fold
Image

Image
 
#15 · (Edited)
Wow! This is great... I'm delighted to see various alternative bench designs get posted in this thread! Thank you! I like to see alternatives to solve a given problem. Keep 'em comin'! (and that includes you J!)

Neil, regarding how the legs are going to get attached, I was thinking of duct tape and bubble gum :eek: but decided to go for something a little more bomb proof. ;) Below is a shot of the end of a leg with a tapped hole, and the 8mm threaded stud that it will spin onto. I found the aluminum plate in a scrap bin with all the holes conveniently present, except for the Drill & Tapped hole that the stud resides in.

Image


When the leg is spun onto the 8mm stud it will look something like this:

Image


The 8mm stud is actually the threaded part of a cap head machine screw so I'll have to drill a small clearance pocket for it in the bottom of the table top. The ends of the AL legs have been milled flat to fit tight and flush against the AL plate. I'm not feeling any play at that joint so the table should be as stout as intended. The table will be a tripod set-up, BTW.

Regarding why the table is ambidextrous, my daughter is left eye dominant so she has started to shoot lefty, even though she is otherwise right-handed. Another benefit of a symmetric table top is that it will fit flat in the trunk of my car. My trunk gets narrower as you go further forward in the trunk. (typical of most sedans due to the wheel wells)

Sincere thanks to all who have posted comments, encouragement and alternative designs... Keep those alternatives flowin'... Let's see what you got. :t

I'll keep on posting as the project gets completed.... :)
 
#17 ·
Here's the one I have currently.

Image


A little over $50 dollars cost. Legs bought at Lowes and the top also bought there.

Not a traditional shooting table but wanted it to double as a normal table when needed. Actually a mistake as the Misses now wants it for herself, LOL. So guess I'll be making another this time may use a workmate bench and a made top.
 
#19 ·
Thanks worriedman, it is handy! It's served for numerous other tasks such as yard sales (several 'lookers' tried to buy the table instead of the mdse :eek: ), picnic buffet server, even works good to hold rifles for outdoor pix :D - One of the other posters did have a good tip tho; think I'm gonna try to locate some fairly lightweight indoor/outdoor or marine carpet & cover the top. Should add some protection for shooting as well as help preserve the top :bthumb:

Image
 
#20 · (Edited)
Nobody, that built-in seat is just the cat's pajamas! Very nice set-up.

Well folks, I finally got her done yesterday. Here's a plethora of pics for your viewing pleasure.

Here's the backside of the table up on the drill press for pre-drilling the holes for the screws that will anchor the 1/4" AL brackets
to the bottom of the table.

Image


Here's the router to provide relief/clearance for the cap head screws that provide the threaded studs that the legs spin onto.

Image


Here's a shot post-routing that shows the routed relief and one of the cap head screws that will reside there.

Image


Here's a bracket, complete with stud, attached to the bottom of the table.

Image


This shows the bottom of the table with all 3 brackets mounted... it's a tripod table for stability:

Image


I routed all the edges of the table with a 3/8" roundover bit to make the table kinder/gentler to humans, and critters like me too. ;)

Image


And here's the full monty pic with a few of my favorite shootin' irons around it...

Image
 
#25 ·
here's mine

Image

Image

I tried to splay the legs out a tad to help with shake. They are splayed by 3/4" riser block but I really wanted to go 1.5". The bench is really huge, much bigger than needed or used. There is alot of wasted space, the next one will be smaller. That is if I dont make a really heavy one with aluminum pipe legs.
Mine was made out of a half sheet of 1" ply and legs someone tossed in the trash. The legs should be really heavy and angeled if not braced well or they will shake. Mine also gets used around the house a bunch. I found another set of legs but the old man stole them and a sheet of oak and made a banquet tabe, what a waste:D . I also made a top for a tripod i had but honestly dont think it would have really been stable enough to shoot off of. It was fun to make but tossed it earlier this year.
Image

Happy building.