Rimfire Central Firearm Forum banner

How I adjusted the trigger on my Marlin 60 (Drawing)

212K views 256 replies 118 participants last post by  Mark75H 
#1 · (Edited)
There is no right way to adjust the Marlin 60 trigger or to remove trigger creep but after reading many posts on this forum about what others here have done I tried my hand at it. I also came up with some on my own. When I was done my trigger pull had gone from being able to pick the rifle up in cocked position with the safety off by the trigger without the rifle firing to about 3#'s. I hope this helps someone.
 
See less See more
1
#6 ·
The JB Weld trick doesn't need much JB Weld at all. Just a little bit on the nose then let it dry and then sand a nose shape back on. Repeat until most of the creep is gone. If too much JB Weld is applied you can sand off the excess. My rifle has just a little bit of creep now but much less than when I started.
 
#9 ·
SimonFencer said:
I don't have a 60, but that is very cool. Thanks for posting it, it definitely adds to the pool of knowledge here.

Paul
Just trying to take some of the mystery out of the Model 60.:) While I don't really care for the design of the action I do like the design of the rest of the rifle except the plastic trigger guard and feel that we (and the rifle) deserve the best trigger pull that we can give it. Marlin give us an aluminum trigger guard........:D
 
#13 ·
libraflo said:
Could someone elaborate on the gap which is filled by the JB weld please?
I have a model 60 and also a new model 717 M 2 which someone said has a very similar trigger. TIA
The JB Weld is to remove the trigger creep. If you can build up the little nose so that it is closer to the part of the action that it pushes against you can remove the trigger creep. Be sure that there is still a nose when you are done or the rifle will not fire.
 
#14 ·
LD: Thank you very much. :t

Looking at the illustrations, I am thinking that the "nose" is the slightly rounded part on the vertical piece that looks like it bears on the horizontal piece just in front of it. Reduce that gap with properly finished JB?

THIS one is going into my files. :)
 
#15 ·


This helps too.
I have the triggers in my model 60 rifles set at about 2# to 2 1/2#. I made one lighter but found it to be too sensitive for field plinking and silhouete match use. I was doubling with the one I set at 1 1/2#. To get that pull weight I rebent the trigger return spring in the guard so it just barely returned the trigger to it's forward position, cut two coils off the hammer spring, smoothed the sear and hammer notch and put moly grease on everything that moves in the lower action. I've had no misfires with the shortened hammer spring. To raise the trigger's pull back to a little over 2# I bent the trigger return spring back toward it's original configuration for more initial pull weight.
 
#16 ·
C.C. said:
LD: Thank you very much. :t

Looking at the illustrations, I am thinking that the "nose" is the slightly rounded part on the vertical piece that looks like it bears on the horizontal piece just in front of it. Reduce that gap with properly finished JB?

THIS one is going into my files. :)
You are correct. A little bit of JB Weld goes a long way. If you apply too much then sand a little off. If not enough then add a little more. A lot of trial and error but an improvement can be easily obtained. Just don't get in a hurry and always let the JB Weld cure completely before sanding. Be sure to rough up the original plastic nose first so that the JB weld will stick.
 
#17 ·
CharlesC said:
This helps too.
I have the triggers in my model 60 rifles set at about 2# to 2 1/2#. I made one lighter but found it to be too sensitive for field plinking and silhouete match use. I was doubling with the one I set at 1 1/2#. To get that pull weight I rebent the trigger return spring in the guard so it just barely returned the trigger to it's forward position, cut two coils off the hammer spring, smoothed the sear and hammer notch and put moly grease on everything that moves in the lower action. I've had no misfires with the shortened hammer spring. To raise the trigger's pull back to a little over 2# I bent the trigger return spring back toward it's original configuration for more initial pull weight.
Marlin's trigger return spring design is definately the cause of most of problem. The force needed to over-come the pressure of the return spring is why some of these rifles have a 20# pull to begin with. Many say that their model 60 has a great trigger pull right out of the box. Many of us aren't as lucky.
 
#19 ·
milgunshooter said:
I found the hammer spring didnt have anything to do with the trigger pull. I removed the trigger return sprign and weekened the spring on the transfer bar that the top of the trigger touches. Result is a short, crisp very light pull. :t
Different things work for different people....there is no right way. I'm glad to hear yours is setup and working better than how it came from the factory. Mine came out the way I wanted also. I wish one of the sponsors sold a drop-in modified action and trigger guard kit for these fine little rifles. They could probably sell them to Marlin as a factory replacement.
 
#20 · (Edited)
my 7000 trigger is so poor. the trigger feel is terrible. like a blunt, blocky thudd. i cant understand how marlin could have made the trigger that poor. if this will make it feel sharp and tight, with a snap, im in.

i am about to sell my 7000. it feels like junk. i think that with a lower trigger pull, i could get better groups.
thanks

i agree MIL, the majority of people would benefit from a lighter return spring. that is a source of unwanted tension.
 
#21 ·
OK - I'll a ask newbie question. Has anybody addressed the overly aggressive sear / hammer engagement surfaces? If I push the sear manually with a small screwdriver (thumb on the hammer to keep it from flying forward) - it is obvious it needs alot of force to release the hammer. This seems to me (in my very limited view) to be where 90% of the resistance is coming from, no?

Mudbat
 
#22 ·
Mudbat said:
OK - I'll a ask newbie question. Has anybody addressed the overly aggressive sear / hammer engagement surfaces? If I push the sear manually with a small screwdriver (thumb on the hammer to keep it from flying forward) - it is obvious it needs alot of force to release the hammer. This seems to me (in my very limited view) to be where 90% of the resistance is coming from, no?

Mudbat
Yup, that's pretty much right. That's why cutting the hammer spring a turn or two and a dab of moly grease there helps, at least in my rifles. Messing with those sear/hammer surfaces can get you a very light trigger, a pound or less. That said, I don't recommend sear tinkering unless you really know what you're doing or have spare parts. A 2 to 2 1/2 pound trigger feels pretty good on my model 60's.
 
#24 · (Edited)
Model 60 trigger pull improvement

OK, you guys got me inspired to do this. I now, so far, have a trigger pull of about 40 oz. which is a helluva lot better than where it was. Here's what I did up to this point & I hope my terminology is close.

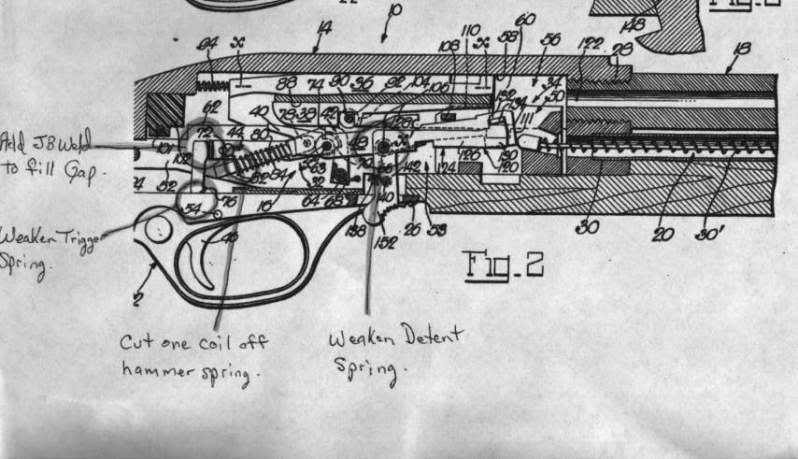
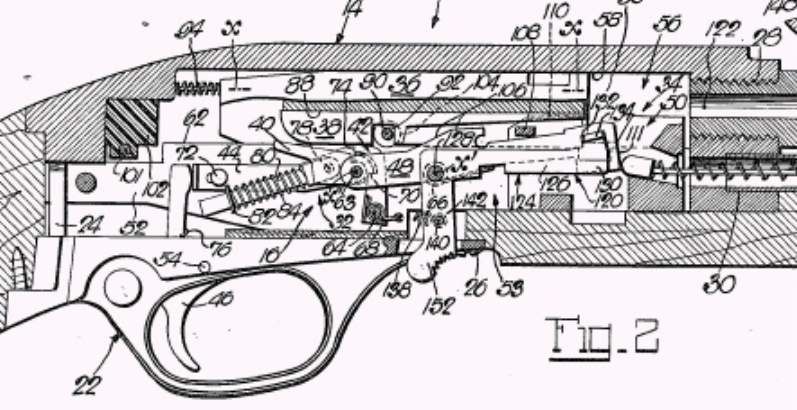
1. I did NOT mess with the sear/hammer geometry except grease it.
2. Trigger return [torsion] spring: replaced it with a Floppy Disc Shutter Spring.
3. Hammer [compression] spring No.28 : replaced it with a 3/8 dia x .041w. x 1.25 compression spring. It was about half the spring force however I added 2 little nylon flange bushings in each end to center it up and a steel washer to seat on the guide shoulder. Local hardware store stuff.
4. Disconnector (Trigger linkage) [torsion] spring No.15: I tried to replace that with a FDSS but it would not stay situated so I just modified the existing spring by over stressing [lil more closed] it as another Forum member suggested.
5. Sear [torsion] spring No.43 : I gave that a new anchor point by drilling a new hole in the side plate just below its previous anchor point [the Ejector/Lifter spring stud]. I also bowed that anchor leg to reduce the forces even more. This worked out great and its much easier to dis-assemble too.
The new drilled hole has a c'sink on the outside to help anchor that spring leg too. [Similar the the way the Trigger linkage [torsion] spring is anchored in the side plate.
6. Test fired 10 rounds with no issues. This is sweet. More to come.
http://hometown.aol.com/marklener/page3.html
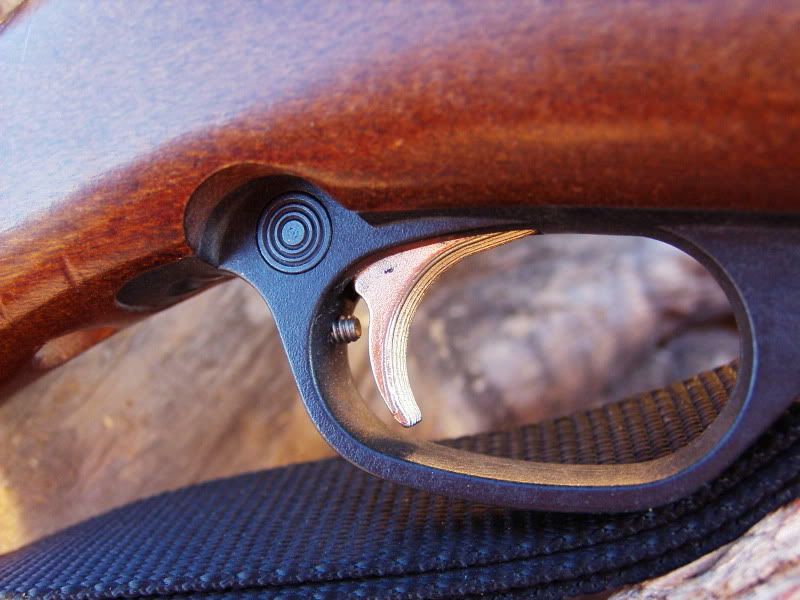
 
This is an older thread, you may not receive a response, and could be reviving an old thread. Please consider creating a new thread.
Top